Pages

June 23, 2014

DIY No-Sew Pocket Tee

Happy Monday Friends! 

I'm currently sitting on the couch next to husby with the dog curled up at our feet and listening to a summer storm roll in through the rolls of thunder. 
It's bliss at the end of a long day. 

This weekend was filled with shopping, swimming & a few fun projects that I had been wanting to get to for a while now. 

I decided that since it's been all things baby around here lately, I should do a fun project for the big kiddos :) 

Little miss was shopping with me at Hobby Lobby last week and wanted something to wear with her "E" on it so we came up with the perfect, super-easy pocket tee which, thanks to Hobby Lobby, was the easiest project ever. 

I'm talking the kind of project that takes longer to open the packages than to actually put together. 
Which is great for me at the moment since I don't have as much endurance for long projects! 

Check out the cuteness of our little saturday project!!


Oh my goodness cute, right?? 

I was terrible and didn't take before pictures because, well, I mean, it literally took 2 seconds to do. 
So imagine a white t-shirt if you will :) 

And thanks to Hobby Lobby, we had all the cute supplies we needed in one aisle. 

Supplies: 
*Plain White T-shirt
*Iron-on Glitter pocket (Hobby Lobby) 
*Iron on Initial (Hobby Lobby) 
*Iron

I'm just in love with all the iron on appliques that Hobby Lobby has. 
I was super excited to find these cute pockets there & they had several really cute options. 
We chose the gold glitter one. 

And for the t-shirt and both appliques, we are talking under 10$, friends. 
Especially if you use your 40% off coupon. 


They also have great iron on 'fabric' sheets that I've bought a couple times to use with my silhouette. I'll be sharing a cute outfit I made for Baby M soon with some of the gold iron on sheets they had. 

But you can also order iron on vinyl, even flocked or patterned, offline for your cutting machine if you don't have a Hobby Lobby around or want different colors. 


Anywho. 
So really...the instructions are self-explanatory. 

1. Wash your shirt prior to ironing on your appliques to make sure it shrinks before adding anything. 
2. Set your iron to the correct setting according to the package. 
3. Iron on your pocket first. and let cool for a few minutes. 
4. Iron on your cute initial. 

And you're DONE!! 
Easy as that :) 

And then get someone super cute to model it for you! 
Little miss was super excited about her shirt and was more than willing to pose it up for me. 


Now she's wanting me to make Baby M a miniature matching one so they can match :) 


I've gotten into more sewing lately and surprised myself with what I can do but, guys, I love a project that doesn't involve pulling out the sewing machine and is still extra cute! 


So grab your iron and get to creating :) 

Have you guys used the iron-on appliques before and loved them as much as I do? 


post signature

Pin It

Like me on Facebook. Follow me on Pinterest. Subscribe to my feed

Linked to :
Inspire me Please @ Liz Marie



June 20, 2014

Easy DIY Grain Sack Ottoman


Sometimes the most awesome updates only take a couple minutes & are some of my most favorite projects!! 
I love instant satisfaction projects :) 

Remember my reading nook update I shared yesterday? 
Did you happen to see the cute grain-sack ottoman hanging out there? 

It was such an easy transformation and is one of my favorite things in that back living room :) 


It brings so much texture into the room & brings in that vintage vibe that I so adore. 
Since the ottoman had already been painted from it's original redo, this was an easy & very quick update. 


I knew I wanted to update the chair and get rid of some of the pattern so when I stumbled on this grain sack at a local flea market, I was keeping my fingers crossed that it would cover this chunky ottoman. 

I was somewhat disappointed when it didn't cover the whole thing without having the seam on the side but after looking at it for a couple days, I decided to embrace it and love it now!! 


For a super easy ottoman recover just follow these steps: 

1. Unscrew the top cushion from the legs by taking the screws out from underneath. 
2. Cut your fabric (in this case, grain sack) to cover the cushion with a couple inches extra on each side to allow it to stretch around the back of the cushion. 
3. Use a staple gun to attach it to the back- make sure to pull tight as you go around and tuck the corners in neatly. 
4. Reattach the cushion to the base with the original screws.
5. Sit back and admire your "new" ottoman :) 

And that's seriously it guys!
A few minutes work & you have a fresh piece to add to your decor :) 
And it cost me the amount of my grain sack- about 5$!


Isn't that typography to die for? 
I've been scouring our flea markets for a great burlap grain sack- most of the ones I find are a plastic-type material that would be terrible for upholstery.
So I was incredibly excited when I found this one :) 

Check out the difference just recovering the ottoman made!!!


I love updating a space by just changing the pieces you already have- definitely the most budget-friendly way to get a makeover in :) 

Have you ever upholstered with grain sacks before? 


post signature

Pin It
Like me on Facebook. Follow me on Pinterest. Subscribe to my feed

Linked to :
Inspire me Please @ Liz Marie


June 18, 2014

Yellow & Blue Reading Nook Update


Hey Friends!!

Hope you guys had a great & relaxing Father's Day weekend. 
We have been super busy but have enjoyed finally having some gorgeous summer weather to play in. 

We've also had some great things happen in the nursery over the weekend which means *eek* we can finally get a photo shoot of the room which means......the big reveal will be right around the corner!
Are you as excited as I am????

Today I wanted to show you a continuation of our summer living room update. 
I shared my faux mantel and summer updates with you guys last week and I wanted to share another update we did to the room which was finally bringing a little more color & personality to the reading nook. 

I first shared this space with you nearly four years ago!!!
Where has the time gone?? 
The pictures & decor from that post definitely show that I was still a newbie at this whole blog thing and I'm much much happier with the space as it is now. 
Getting rid of that nasty carpet was a huge step in the right direction :) 

Ok...so let's take a deep breath together and see the space how it was four years ago...


And I was so proud of it back then too :) 
I still do love my viking chair redo from back then. 
And that sweet siamese cat in the corner of the picture who isn't with us anymore :/ 

But my style has completely changed over the past year with lots of bright pops of color and a mix of vintage & modern. 
Things evolved slowly for this space, like I said, getting the new floors in made a big difference. 
The chair has stayed and the table has only recently been replaced with a different one.
Which is a story for another day. 

Buttttt, check out the bright & cheery space that it is now!!!!


Isn't it so much more fun & inviting now?? 

This is still the best reading spot in the house & now it's the most cheerful too :) 


I love how the tiny collage wall came together with some of my favorite pieces. 
That little yellow mirror was a DIY project from my spring mantel several years ago and found a great home in this little nook. 

And the 'Truly, Madly, Deeply" is special to me & the hubs because I made it for him when we were first dating. 
It hung in his apartment for about 2.5 seconds before we got married and it came to live here!! 
The empty white frame is from Hobby Lobby & a painted C hangs in the middle from our wedding. 


This little turquoise table makes me giddy every time I see it.
Which it better because it caused an entire redo of the living room just so I could keep it in here. 
Like I said, more of that story later :) 

But it's an absolute gorgeous piece that I redid last summer and it was meant to live in this space. 
I added a few burlap-covered books, a framed beach picture and a vintage white glass lamp that my mom has had forever. 
The new shade came from Target. 


Like I said, I still love my chunky chair that I redid years ago so it definitely needed to stay.
It's the perfect size for curling up in with a good book & hot tea. 

The only thing was is that I was getting somewhat tired of the brown & white design on the chair & ottoman. 
I really didn't want to redo the whole thing and I finally decided how to update it easily. 

Enter in an easy transformation :) 
I"ll be sharing more details about the cute little ottoman in the next couple days.
But in the meantime, enjoy the before & after of my little reading nook. 


I love love love how bright & airy it feels now!! 
Definitely much more my style and makes the room so much happier to be in. 

What do you think??

Isn't it amazing what a few changes & an infusion of color can do?? 
I'm still amazed at how far this room has come in a few short years. 


post signature

Pin It
Like me on Facebook. Follow me on Pinterest. Subscribe to my feed


June 10, 2014

Summer Faux Mantle Decor

If you checked out my summery living room update yesterday, you may have noticed the bright decor on top of my faux mantle!!

I love having another mantle to decorate in the house and this one is gorgeously chunky which means lots of fun things can go on it!

The other awesome thing about this mantle is that it's from my parent's house. 
When they remodeled, they were getting rid of the original fireplace which meant the mantle was just going to get ripped out and thrown away.
I asked the builder if I could get it intact and he just pulled it right off for me!!

We secured it to studs in the wall and I love love love having it in our house! 


I love being surrounded by bright colors in the spring & summer months so there are lots of blues & yellows happening in this back living room. 


The star of the show is my "Life is Extraordinary" sign from last years spring mantle. 
It's still one of my favorite roadside finds. 

I added a cute paper pennant banner across it for some texture & color. 


For each side, I layered different frames & accessories for some color. 
I love layers on mantles and usually grab a bunch of things from my stash and just try them out until I find something I like. 
Since I usually make several new things each season, I usually have a nice-sized stash of things to play with :) 

On the left side, I added a painted yellow frame, a framed printable that I love and a Dollar Store painted frame that used to be a mirror. 
And of course I had to throw some milk glass and one of my birds into the mix! 


I love adding small sentimental items around the house so some seashells from our first family beach trip last year made it to the mantle. 
Perfect touch of summer :) 


On the right side, I added my gold striped mirror from fall, layered with the silhouette of little man that I did forever ago. 
A simple blue plate finished it all off. 


I love how summery this room feels...it makes me smile every time I walk into it! 
Are you brightening things up around the house for summer? 


post signature

Pin It
Like me on Facebook. Follow me on Pinterest. Subscribe to my feed


June 09, 2014

Summery Living Room Makeover with Coffee Table Before & After

Hello there friends! 
Can you believe that I really am actually alive & well out here?? 
I've been a terrible blogger but it's been a relief just to focus on my new job and spend time with my sweet family of four while we are still four :) 

We have been plugging away on our Baby Girl nursery and I am over the moon excited to share it with you soon! 
It has turned out every bit like I imagined it would and even better! 
Hubby has done such an amazing job of helping me take my vision and bring it to reality. 
Now we are just waiting on our rocking chair to get reupholstered to get the finishing touches in :) 

So in the meantime, I figured I should show you how I brightened up our back living room for spring & summer. 
I love this room in our house because it's full of light and has my little reading nook in it. 
I'll be sharing an update of that little space later this week!! 

I don't have any good before pictures but it was pretty much just a couch, coffee table and a few things hanging on the wall. 
It's changed a lot over the past couple years and I finally have it feeling bright & cozy...just the way I like! 

Check out our cute & summery space!! 


This living room opens right into our bright & gorgeous dining room area so they share the same blue & yellow colors that I love so much. 

I'm only sharing a small part of the room because there have been several transformations going on in there lately!
Including my reading nook & a new office space that had to happen since the computers were kicked out of the now-nursery. 
Don't mind the crazy lumpy couch- it's not a forever piece for us but it is the most. comfortable. thing ever. And not an eye-sore at the moment so it stays :) 

Let's talk about the coffee table for a minute. 


This pretty little piece was redone nearly four years ago! 
I know, I've been terrible.
But I could never get good pictures of it and just didn't feel like messing with it, honestly. 
But it was one of my first pieces & I love this little table!!

Here is what it looked like before: 


I think it was a Goodwill find. 
I love the curves and details along the sides so I snatched it up. 
I decided to go for a two-toned look for it and am so glad I did!
It has been perfect in the ever-changing decor of that room. 

First things first, I sanded down the top to get the varnish off and then re-stained it with dark walnut stain.
That red was super stubborn and kept wanting to come through so I dry-brushed some dark glaze over the stain for a deeper brown. 
And it was perfect :) 


I painted the bottom in a satin white and *gasp* didn't distress it.
Although I probably should now since it's had it's fair share of dings :) 

But check out the before & after on this beauty!!


So much better, right? 


I love, love, love all the details on this table. 
Definitely will be sticking with us for a while!! 


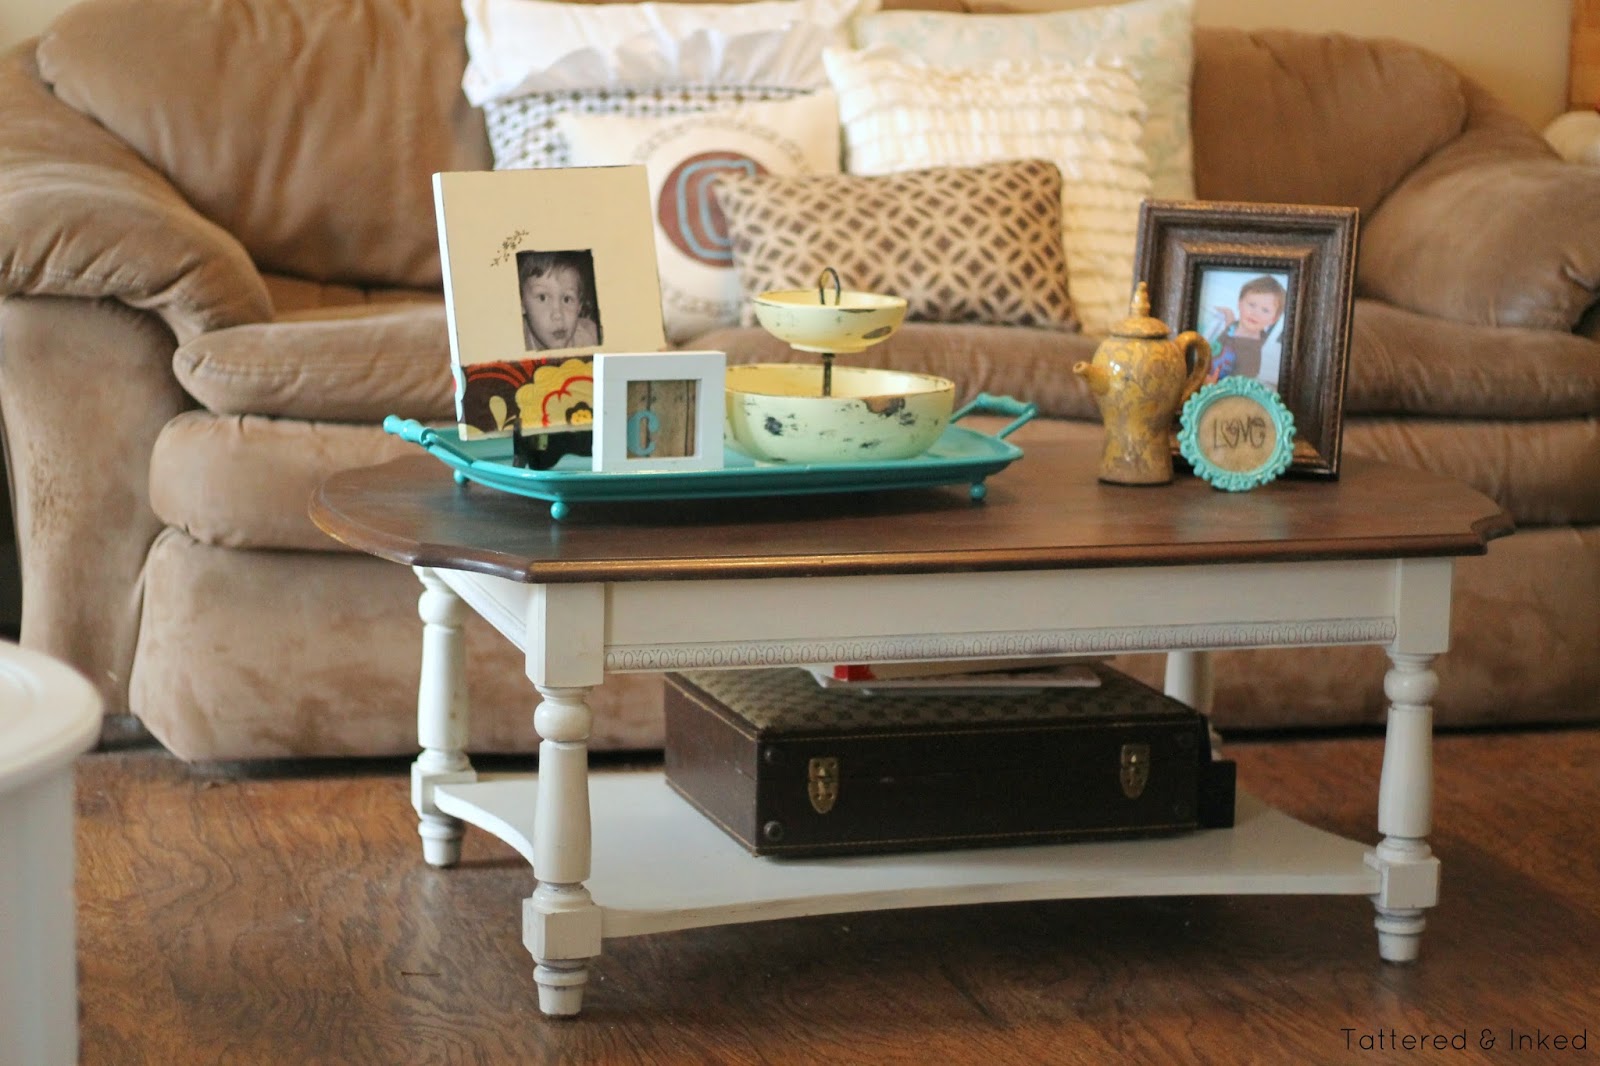
The coffee table has an eclectic grouping of things on it that I just love!
I found that vintage suitcase forever ago and love it on the bottom shelf. 

I used a blue tray from Hobby Lobby that we used at our wedding to hold a grouping of frames and my cute distressed tiered bowl. 
The bowl was a goodwill makeover, as was the cute frame. 

The small 'love' frame on the other side was from our wedding too. 


This room has lots of brown tones in it with the couch and dark wood floors so I love bringing in bright accessories to lighten it up. 
I use my favorite yellows & blues in the frames, wall decor & pillows to keep it light and airy.
It would easily become too dark & stuffy if I let it. 


The fun pillows are a mix of DIY ones that I shared forever ago, including my duck-cloth pillow (with an updated "C" now) and my painted burlap pillow.
The other pillows have white & blue pillow covers over them to keep it bright!!

I know you're dying to hear more about my spring faux mantle...and I promise I'll be back this week with more details! 

I'll also be sharing the office area & the updated reading nook too :) 
So stay tuned, friends!!

Hope you week is going amazingly!!


post signature

Pin It
Like me on Facebook. Follow me on Pinterest. Subscribe to my feed