Pages

September 30, 2015

Weathered Grey & White China Cabinet Redo

This week already feels so long!
I can't believe it's only Wednesday!

I thought I'd pop in and share my most recent furniture redo since it's basically my most favorite ever!!

It's definitely one of my biggest & I love taking on different pieces to see what kinds of challenges I can tackle :)

I found this beautiful china cabinet at our local Habitat Restore for around $100. I think it was a deal day so I'm thinking we actually only paid $75 for it. A steal either way. 
It was solid and didn't have a scratch on it. 

Although it was missing one side glass panel. But for what I wanted, they were going to go away anyways. 
But isn't she pretty? 


This piece was in great condition so it didn't need a ton of prep (my kind of project!). 
I lightly sanded away any rough spots and gave it a good cleaning.
Hardware came off. 


It did have one pane of glass still on the side so I ended up taking it out.
It was held in place by rubber lining and was easily taken out by removing the rubber pieces and sliding the glass out.
Love when things go willingly :) 

I had a fun project all planned for the extra piece of glass but it was broken while moving some things around so that was kinda sad. 

Next things next, I knew that I wanted to paint the inside of the cabinets & the back of the main area a different color than the rest of it. 
It took me forever to decide on color combinations but since it was going to be sold, I decided to go for a less bold, more neutral look but still absolutely gorgeous.

The back wall and inside cabinets got several coats of a pure white. 


The rest of the piece got several coats of Cece Caldwell's paint in 'Silverhill Fog'. 
It was a beautiful soft grey that gave it the perfect finish I was looking for.
However since this piece was so large and needed several coats, it took a LOT of the paint. 
Pretty darn near all of it.
So I was somewhat disappointed with how far the paint went. 

After painting it grey, I knew I wanted a more weathered, vintage look so I tried out some cheap white wax that I had on hand. 
I say cheap because, you guys, it was five bucks at Walmart. 
Mind blown. 

Check out that gorgeous vintage finish: 


I literally squealed out loud as it was going on because it looked so good. 
That's when you know it's going to be amazing :) 

After applying and buffing the white wax, we went ahead and decided to add chicken hex wire to the side panels. 

This awful awesome stuff. 


It was the absolute worst part of the whole project.
I'm just glad that my sweet husband is a whole lot more patient than I am or I would have tried to sell the empty side panels as the new 'in' thing. 


The hardest part was the fact that we were installing the wire in panels that were not removable. Cabinet doors would be a snap because you can take them off and staple it onto the back. 

But for these we basically had to become contortionists to fit ourselves sideways into the thing and try to staple/nail into tiny little grooves to attach the wire. 
The other thing going against us was that the wood we were attaching it to was mostly very thin trim molding pieces that would easily be cracked or damaged if nails or staples were too long and ended up in the wrong spot. 

Thank goodness that husby was able to figure out a good system of nailing tiny finish nails around the perimeter to secure it in. 

I dry-brushed some white paint onto the wire to help it blend in a little more naturally and downplay the industrial feel just a tad. 


After installing the chicken wire, it was time to get it all put back together. 
I re-installed the original hardware and dry-brushed some of the white wax onto them to soften them up. 

Then it was my favorite part- step back and admire you're finished piece!!


Didn't she turn out just gorgeous?!? 


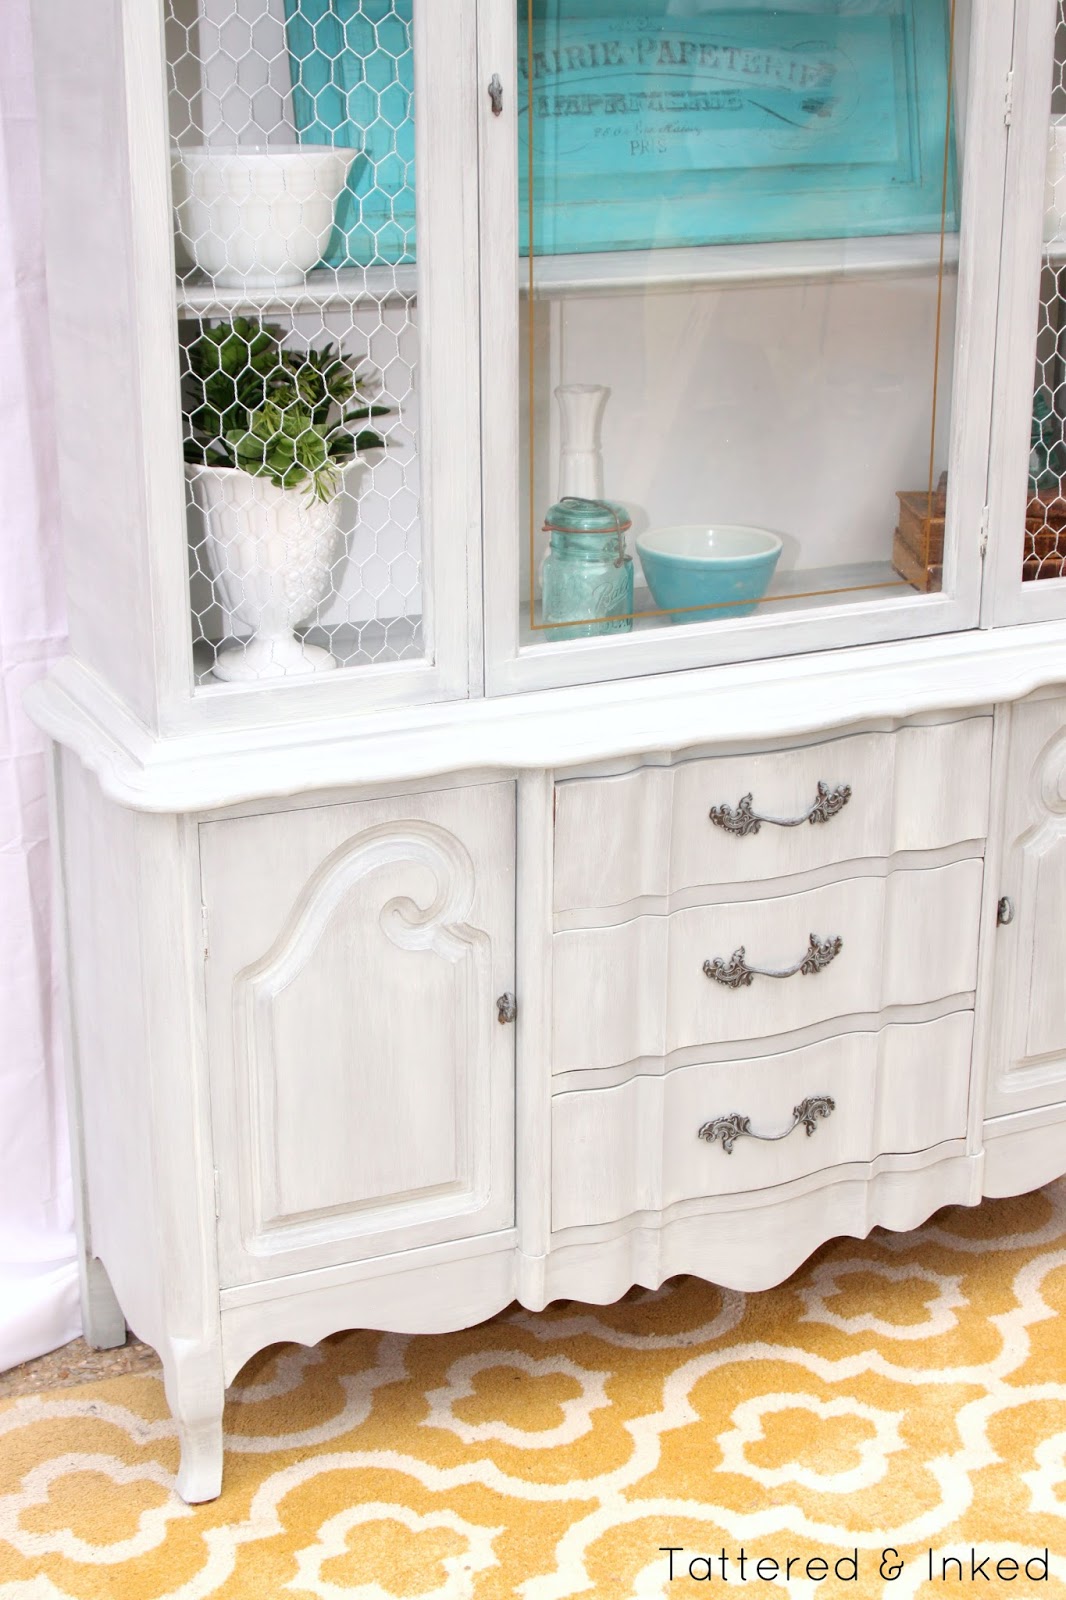
I love how light & airy it feels now with it's lighter coat of paint. 
Those drawers & doors have curves for days and I feel like the lighter paint helps accentuate that more. 


I love the pop of fresh white against the grey finish- it's a bit more dramatic in person but you can get the idea from the pictures :) 


It was a bit more challenging than other pieces had been for me to style.
We couldn't really drag it in the house since we didn't have a great spot to photograph it so we set up shop outside and dragged things to it!

I love my blue pyrex in there against the greys & whites. 
Hubby was so enamored by it that he tried to convince me to find a place in our house for it. 
But I just can't replace the pieces we already have since they are family heirlooms. 


But I'm thinking it'll look gorgeous wherever it ends up! 


Check out the crazy before & after: 


It's so hard to believe it's even the same piece. 
I just love the weathered grey finish against the chicken wire doors!!


I'd love to hear your thoughts/comments on my newest makeover!!

It's up for sale, so if you're local, message me on Facebook or email me to chat about bringing it into your home!!

Happy Wednesday friends!


post signature

September 23, 2015

Painted Pumpkin Basket with DIY Transparency Lettering

Sometimes when you're thrifting, you find something that catches your eye but you have no idea what you're going to do with it, right? 
But you get it anyways. 

Then, inspiration hits and you realize you have something amazing on your hands. 

I love when that happens :) 

I found this little basket on a random Saturday that we spent roaming garage sales. 
I walked by it several times before deciding that it needed to come home with us. 


There were a ton of things I loved about it: 
the oil rubbed bronze handle that was oversized and awesome, the fact that it was some kind of wooden veneer material that could be easily painted, it's weird oval shape & huge bonus that it had this awesome brass/gold edge on the bottom of it. 

I figured it would be perfect for some sort of project. 
And when coolish weather and pumpkins started hitting our area, I was struck with the fact that it needed to be fall related. 


I wanted something that had chippy paint & typography and I ended up with a gorgeous mix of the two!!


First things first, I taped off the brass bottom and the handles and gave it a couple coats of a whispy blue I had on hand. 
After painting, I chipped the paint off in areas around the edges of the basket to give it a nice worn look. 


It took me a while to figure out what type of wording to put on it. 
Then I stumbled on an image of a vintage pumpkin seed packet and I knew it was perfect. 

I typed the lettering into Picmonkey.com, saved the images and then decided to wing it as far as applying it to the basket. 

I had some transparencies that I had been saving that I picked up at a school closing sale.
After googling it, I decided to try my hand at making my own rub-ons of sorts.  


Here's the VeRy basic run-down on how I did it: 

1. Find the lettering/image you want to use and save to your computer.
Make sure any text you're wanting to use is saved in 'reverse'. 

2. I wanted my text to be larger than a normal sheet of paper so I used blockposters.com to enlarge my font to the size I wanted.
After creating the image, it gave me the option to print. 

3. Print your image/text on the glossy side of the transparency paper. 
Make sure to not touch the wet ink after it prints. 

4. Apply the transparency paper ink-side DOWN onto the surface you want it to adhere to. 
Use a wooden spoon or Popsicle stick to burnish your image onto your item. 
I found that lightly rubbing did the trick because if you pushed down to hard, the ink would smear. 

5. Carefully lift up your paper and check out your beautiful image!!
I love love loved the result!!


It gave me a perfectly worn look without any distressing necessary- the ink settled into cracks & imperfections and didn't go on incredibly dark so it looked aged all by itself! 

The ink did take a while to dry so let your item dry for a while- I let mine sit overnight before messing with it.
Then I sprayed a clear coat of spraypaint over it to help protect it even more. 


I'm kind of obsessed with my new pumpkin basket!! 

I filled it with some cut fabric pumpkins that I got on sale from JoAnn's.
Isn't that mustard fabric gorgeous? 
I have big plans for a scarf & some headbands out of it :) 

Here's the Before & After comparison of my little thrifty basket: 


Isn't is so much more fun in pale aqua and distressed lettering??

I definitely think so!!

I have so many fun fall ideas in my head but I'm also holding out on a BIG secret that I'm hoping to be able to reveal verrry soon that kinda has an effect on my fall decorating!!

Happy Wednesday friends!


post signature

September 16, 2015

Pink & Gold First Birthday {FREE| Printables!

Last week I shared our beautiful first birthday party we threw for Baby M. 
I'd love for you to check it out here!! 

I had promised you guys that I'd be sharing the free printables on here soon and I'm here to deliver on that promise today :) 

Printables are my absolute favorite things to do for every party I throw- they're easy to customize, add crazy personality to your party & are so fun to change out!

This party was done in shades of mint blue, soft pink & gold with lots of confetti & bows thrown in since our theme was 'Bows & Bling'. 

Below you'll find each printable file that I used for the party and quick instructions on how to use them. 
Invites & personalized items are left blank for YOU to add your own names/wording to it.F 
You can use photoshop or any free photo editing site (I use picmonkey.com) to add your own words.
On picmonkey, when you add a font to the print, there is a tiny little dropper symbol that pops up when you click on the word. 
To change your font to the same color as the rest of the printable, simply click that dropper, drag your cursor over the color in the print that you want to use and it'll match it perfectly!!

Let me know if you have any questions- I'd love to help you anyway I can.
For pictures & ideas on how to decorate with the printables, check out my party post here

Hope you enjoy your free Pink & Gold Birthday Printables!!

..........Quick tips for printing in case you’re a newbie….......
1. Click the download link below each picture for the print you’d like to get. Then follow the prompts to download and save to your computer. 
2. Print your printable as you would any regular picture. I like to print them on white cardstock or picture paper- they tend to print better and with more vibrant colors this way. 
That’s pretty much all there is to it. So get at it…just click. print. frame!!


September 10, 2015

DIY Re-purposed Drawers Turned Monthly Picture Displays


Good morning friends!!

I'm going to be sharing several of the DIY projects I did for Baby M's first birthday party!
If you haven't had a chance to check out the whole party, I'd love for you to swing over here and see all the fun!!

Sometimes some of the best projects happen completely by accident. 
And that was definitely the case for these guys. 

Can you believe this was the end result?!? 


It all started when the hubs snatched up this cute little dresser from a friend of his: 

September 08, 2015

Blue, Pink & Gold First Birthday Party

Hello sweet friends!!
I hope you guys all had an amazing weekend and Labor Day. 
We enjoyed a lot of family time since there are all kinds of birthdays around this time of year. 

Since I've been in the birthday frame of mind, I figured I might share one of our recent parties for baby M!!
Can you believe she just turned ONE?!

I still can't believe that our Baby M is already a whole year old!
It's absolute craziness that time has flown by so fast. 

We celebrated her first birthday a couple weeks ago during the lovely heat-fest of an Arkansas August. 
I wanted something simple, sweet, a little vintage & fun for our baby girl. 

I landed on a 'bows & bling' theme for her birthday since it's been all about Baby M's bows from the day she was born- we've been so in love with all her gorgeous hair & mama sure has fun dressing it up :) 
I created some fun invitations with the 'bows & bling' wording on it to get things started...