Pages

May 29, 2012

Shabby Striped Frame


Hey you guys!
Did you have a great, sun-filled Memorial Day weekend??

I sure hope it was great :) 
I was able to relax with my boys a bit which was exactly what I needed. 
It's weird having classes sporadically throughout the summer... and having 5-6 days off between each one.
Makes me feel out of sorts some.

But soaking up the sun at the lake this past weekend was amazing. 
And then we just had a lazy family day all day yesterday which is rare. 

But back to all the craziness now :)

I know I'm a tease and I shared a fun sneak peek of one of my weekend projects on my facebook page yesterday...
but that's not what I'm showing you today.
Told ya I was a tease :)
That's coming later this week...you'll just have to stick around!!

I think you'll like this quick little project just as much. 
I was in need of a space-filler when little man accidentally broke one of my doo-dads that sits on my fireplace. 
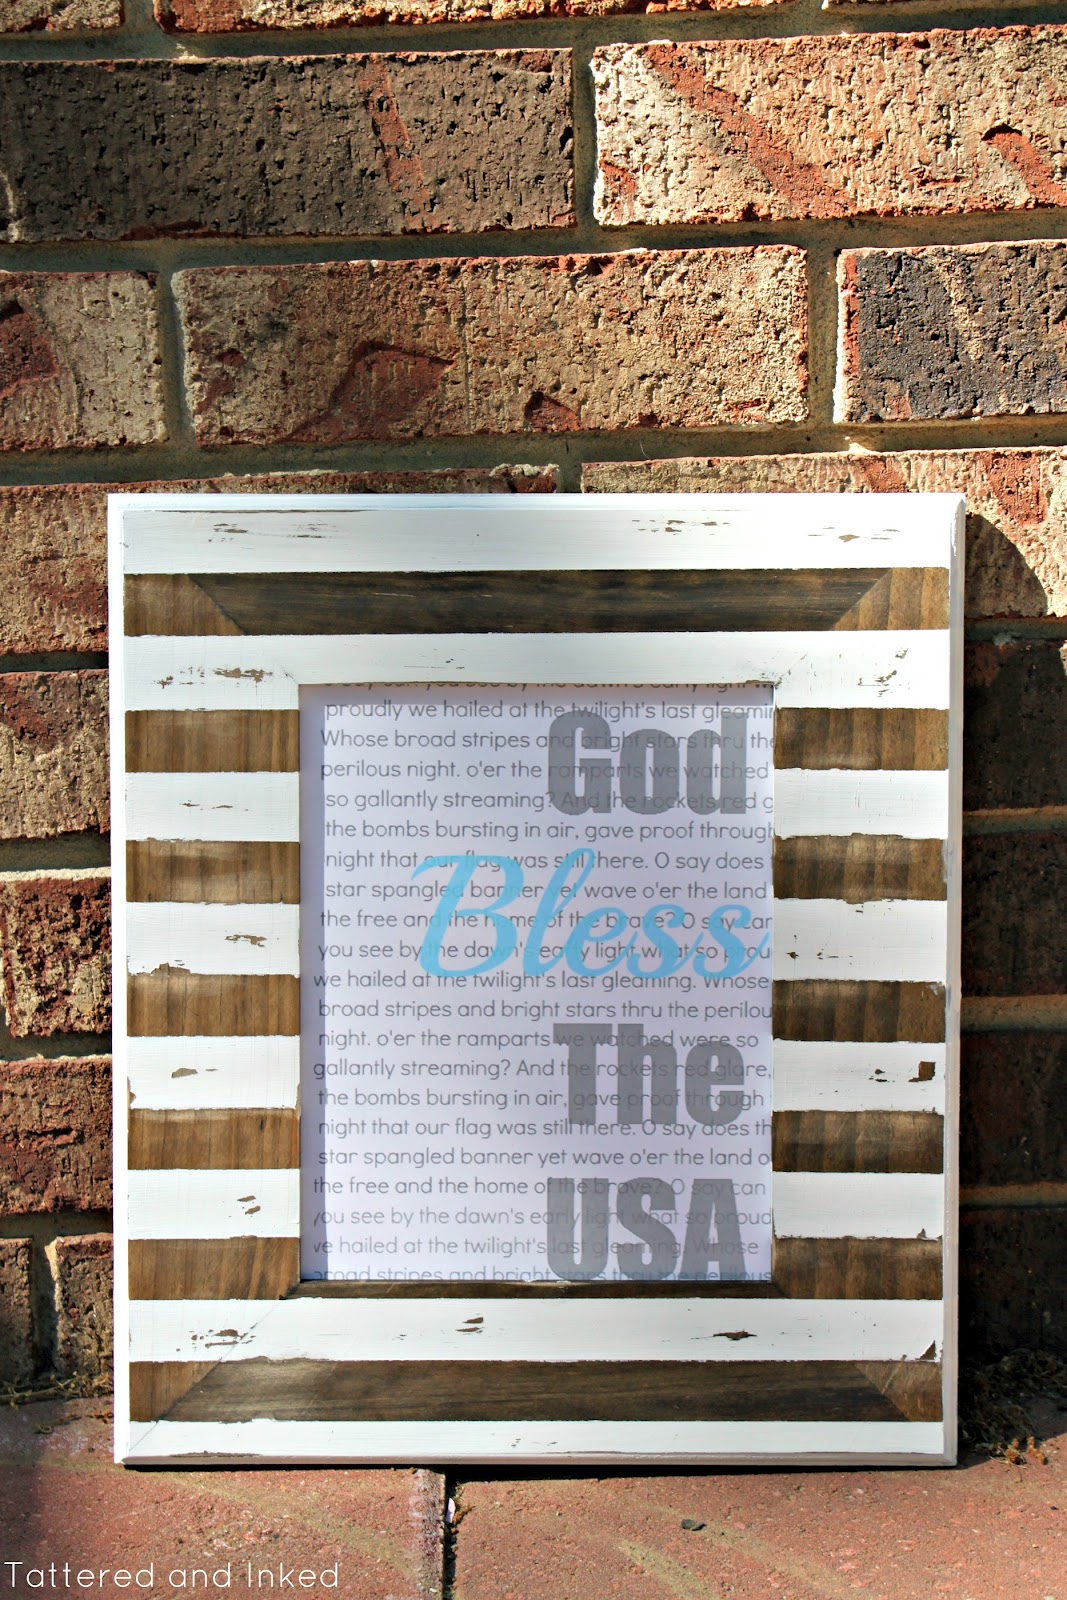
So here's what I came up with...with a little patriotic flare at the moment. 


Didn't it turn out shabby-chic gorgeous? 

I'm in love with dark wood against a creamy white.
It's just perfection...

It started as one of those plain, blank frames from Hobby Lobby...


And I used my new favorite dark walnut stain by Rust-oleum. 
I love love love how this color turned out.
I usually use Minwax but bought this on a whim and am SO glad I did. 
Beautiful dark color :) 


I stained the whole frame with the dark walnut and let it dry overnight. 

I wonder if you've ever noticed that about half my small projects occur on the floor of my living room. haha. 

My rug or coffee table always seems to be in background...
and weird little fact- I've used the same couple pieces of scrap paper to paint/stain on for...umm...forever.
And I finally had to throw them away after this project because they were practically shredding apart. 
Sniff. 


After the stain was good and dry, I used painters tape to tape off some thin stripes. 


Then I painted a creamy white with some acrylic paint I had on hand. 
It took a couple coats to get a good, even coverage. 

I made the mistake of using off-brand painters tape thought...and it bled through some.
No problem with this project because I was shabby-ing it up anyway. 
But good to know for anytime I'm wanting perfect lines. 


Then peel the paint off and you get instant gorgeous stripes!
I took a piece of sanding paper to it to shanty it up. 
I wanted it to have that scuffed look so the stain could show through some of the white stripes. 


And I was in love :)
I'm going to be using it to display different printables throughout the seasons. 
I haven't had a place to do that yet so it's nice to have a frame completely dedicated for change. haha. 


And in case you're wondering where the patriotic bling inside the frame came from, 
you'll be seeing it again soon in a free printable form :)

Cuz I  really do love you sooo much. 


I painted all the edges of the frame white just cuz.
It's one of those things that you just have to know what look you want :)
Paint until it looks right!


Are you over the whole shanty look yet? 
I'm not...but then again, I don't know if I ever will be. 
I like bits of shanty-chic here and there throughout my decor. 
Keeps everything from looking too...picture perfect. 

What do you think of my little striped frame? 
It's an easy summer project that's perfect for displaying all the fun printables out there in blogland!


If you like this project, I'd love for you to

Pin It


post signature

Linking to:


May 21, 2012

A Trio of Stools Makeover

Happy Monday everyone!!!

It's nearly summer break for us :) Are you already there??

Little man is really the only one getting a summer break...I've got classes scattered throughout the summer but I'm looking forward to slowing down the pace a bit for sure.

If you guys hang out with me much on facebook (which you totally should!!)
then you've probably noticed my slight obsession with Krylon's Blue Ocean Breeze spraypaint!

I'm in looovve with it. 
I used it here...and here...and well, here too.

I shared a sneak peek of what I was working on this past weekend with you guys...
and now I'm ready to show the full reveal :)

I started off with these lovely palm-tree encrusted metal barstools that a client wanted to have updated...


Isn't the shape gorgeous?
I loved the beaded detailing around the backs of the seat and the bamboo legs are way cute.

Luckily for me, she loved the blue ocean breeze color as much as I do and I sold her on it :)
 I mean, these guys were completely meant to be beach-inspired but not with depressed-looking palm trees. 

I spritzed them down with the Krylon paint.
It took one full can of paint and a tiny bit of a second for each. 


Don't they just look happy now?
For one extra bit of sassiness, I added some glaze to them too. 
They were kind of a pain to glaze with all their spindly legs and thin details.
But I got it done and loved the result!!!

You can see the difference between the stool on the left (not glazed) and the stool on the right (glazed) below. 


The glaze just gives it a bit more pop 
& makes those details shine!!


I love the backs of these stools!


Am I the only one who just feels happier when I see this color???


Check out the before and after and tell me it doesn't make you want to jump into a crisp, clear pool right about now!!


Are you still into the aqua craze with me? 

I asked this question over the weekend but I'll ask again just cuz I want to know so bad--
what's your favorite go-to spraypaint color this season???

Hope you guys have a great start to your week :)


Pin It


post signature

Linking to:

May 18, 2012

Quick & Easy Personalized Wedding Gift

So, to stay with the theme of this week...
I have one last fun wedding gift idea to share with ya!

This is actually a repost from a couple years back...so it'll be new to lots of my newest fabulous followers :)
Plus it's another spin on the utensil gift I shared this past Wednesday.
Goes to show there are SO many different ways to do it and add your own style to it! 

Hope you enjoy and to add a little bonus, I've added six way cute wedding gift ideas I've fell in love with from the blogworld at the end of the post... so be sure to check out the awesomeness going on over at those blogs!!

***********
Guys, this was so easy and quick!
And it's fun, practical and...well... cute!!

Everything you need for the perfect gift.

I ended up doing this for a wedding shower but think of the possibilities- they're endless!


I started with an empty square gift box.
Those thick cardboard ones, you know?

All I did was take one of the kitchen-sized towels I had and wrapped it around the box, securing the bottom with pins through the bottom of the box.
I didn't want to use glue or anything because you want them to be able to take it apart and use it at some point :)

I just stuffed the towel in around the top of the box and down the sides... the items inside hold it nice and snug so there's no need to adhere it in anyway.


I took the lid of the box and wrapped it in a funky piece of fabric- this time I did use glue.
Then I merely just snuggled the bottom of the box down into the lid... it covers the messiness of the bottom and keeps the pins in.


Inside the box I used a clear glass vase from the Dollar Store to hold all the utensils.
Just tie some ribbon around their handles and stick 'em in!

Then I rolled the rest of the towels and snuggled them in all around the vase.

Nice and snug :)


For the front, I wrapped a piece of ribbon around the box and tied it into holes I punched into the cardstock tag I made.

You could use initials, names, numbers...whatever you can think of!


For a gift tag, I used the same design from the front tag and made another cardstock tag.
I tied a piece of ribbon on the side and slid it in among the towels.


Now you have a crazy easy gift that looks way cute!

So get to filling those boxes... think of all the fun ways!

****************

And just for grins & giggles,
here are SIX other way fun wedding gift ideas to get your creative juices flowing!!


Starting from the left: 


Starting from the left: 


Pin It

post signature


May 16, 2012

Handmade Wedding Gift: A Unique Spin on giving Utensils!


Hey ya'll!

I told ya I'd be back with some more wedding gift fun today :)

I shared one of my most favorite DIY wedding gifts on Monday which you can check out here
The gift idea I'm sharing today actually was for the same couple as the personalized wedding sign
I packaged them up together all cute & had way too much fun making them!!

One of my favorite gifts to give new couples are utensils. 
There are so many things a new kitchen needs and you can't go wrong with a smattering of spatulas, wooden spoons, whisks, serving spoons...you name it!!

However, it can get kind of boring just throwing a bunch of utensils in a box and calling it a gift. 
Plus I'm kind of on a budget...and need something way cute for not a ton of cash :) 
Which I figured most of us would feel the same way!

Which is why I had to come up with a way cuter alternative to just the plain ole boring utensils. 
Soooo, how about a personalized utensil box? 
Check it out...


Utensils just got a lot more fun, huh??

Check out what all is crammed (er...placed neatly) in that cute little box: 
*Two Potholders
*2 Kitchen Towels
*1  Rubber Spatula
*2 Wooden Spoons
*2 different serving spoons
*1 Plastic Spatula

In addition to whatever utensils you decide to get you'll also need: 
*Some sort of container (I used a wooden box) 
*Items to decorate your container if desired
*1 Tall glass vase from the Dollar Store
*Ribbon

I get all my utensils and towels from the Dollar Store or the Dollar Spot in Target... I get basic ones so I don't have to worry about cheap can openers or anything. Just keep it simple :) 
I always get a couple of towels to help package it up pretty. 
Overall on this gift, I spent about 10$. 

Now, there's a little bit of an art to getting everything to fit and it will completely depend on the type of container you're going to be putting it in. 
I've done it before with a larger gift box that was easier to get everything in...this time I used a smaller box which I'll show you in a bit!!

For this set-up, I started off by rolling the pot holders into the vase, leaving an opening for the utensils to slide down into the middle. 
I arranged the utensils in the middle to look pretty :)
The next step was to wrap one of the kitchen towels around the base of the glass vase. 
This will serve as a buffer between the glass and the wood box as well as making it look cuter! 
I kept one kitchen towel out for now. 

Here's what it looked like after all that: 


Next I started working on making the plain wooden box more glamorous.
I got this little box at Hobby Lobby in the unfinished wood section. 
Everything I used to decorate it with I had on hand. 
So drag out your stash and get creative :)

Here are the supplies I used for the box: 
*Black acrylic paint
*White acrylic paint
*Chipboard Letters
*Hot glue gun 

Finishing up the box was super easy and turned out so much better than I originally thought.
I love that it can be taken apart and used for a cute trinket box or decoration in their new home!!

I painted the inside of the box black to give it a pop when it's open. 
I used chipboard letters to say "d&k" and hot glued them to the front of the box. 
Then I just painted the whole outside of it white. 
Right over the letters and everything.
It made the letters look like they had been made with the box the whole time :)


Here's the cutie all finished and ready to be packed full of goodies: 


Isn't it cute?? 
I may have been more excited about giving the box than the utensils...

The last step is just putting it all together. 
This box was tricky because it was on the small side. 
The first thing I did was to scrunch up one of the towels in the bottom of the box.
You can totally skip this step if you want, I just had the two towels already and I was DETERMINED to make them fit!!


Next, slip your towel-wrapped vase snugly into the box.
The towel helps the vase sit nicely in there without moving around. 
Then I used a pretty piece of satin ribbon to tie all the way around the box to the front of the vase. 

This kept the lid from hanging open awkwardly and kept everything all nicely together :) 
After taking the pics, I realized it almost resembled a little Tiffany Box which makes me happy!


Now for it's photo shoot! 
I just loved how it all came together :)


The box is still my favorite part :) 


I did my best to tie a cute bow- I'm kind of completely horrible at them :)


I paired it with the cute personalized wedding sign for our friends and loved the two of them together!
I love giving a practical gift (utensils) along with a completely unexpected surprise :)

Don't they look good together? 


Do you have a favorite item you give for weddings? 

Are you ready to go glam up some utensils now?

I so hope these past two gifts have given you some inspiration and ideas to get through the wedding craziness this spring/summer!
I'd love to hear about any of your own DIY gift ideas you've done!! 
I've got one more fun utensil box to show you on Friday- hope to see you there!!
Have a great week :)


Pin It

post signature

Linking to:


May 14, 2012

Handmade Wedding Gift: Printed Fabric Sign

Ah, it's so nice to be back in a normal routine!!
Being gone from home for two weeks was toooooo long. 
I really had plans to keep up with posts last week but it was enough to just get through that last week of our Louisiana clinical. 
And now I'm baaaaack and I've had tons of snuggles from my boys, a homemade meal & kitty kisses.
So I'm all ready to get back into the blogging groove :)
Have you missed me???

I've had crafting withdrawals the past week and can't wait to whip the spraypaint out and get started on my long list of projects coming up!!

I don't know about you, but it's been wedding & baby frenzy out here lately! 
I had one weekend where I needed two wedding gifts & a baby gift...so I spent the week working like a madwoman to get gifts made.
Because of course I had to make something...

I've got tons of baby gift ideas but I thought that I would spend this week focusing on some cute DIY wedding gifts.
Sound good to you??

This gift was super easy and was the hit of the shower :)
It completely made the mother-in-law tear up which is always a good sign, right??
It was going to my husband's childhood best friend and his soon to be wife. 
So I wanted to make something meaningful and special.

It pretty much started with a bare cabinet door (as a lot of my projects do)
I don't have a picture of the exact one for this project in it's 'before' stage but here's a glimpse into what it pretty much looked like after painting it white...


After painting it white, I of course had to distress all the edges. 
I love this particular door because of the barn door-esque design of it. 
(You'll see what I mean soon) 

And there was dark wood underneath. Score.
The best distressing undercoat over :)


The fun thing about doing this gift was that I already knew the bride and groom were going for a vintage vibe for the wedding.
Which is completely up my alley so I could go all out. 
I went back and forth as to how to decorate in the center.
At first, I thought about just doing a regular paper printable.
Or vinyl.

But then I remembered this project where I had attempted to print on my beloved linen and the idea took root. 
I used the same technique as I did on my last printed project to print out my design.
So definitely check out that tutorial if you want to print on your own fabric!! 

I designed the wording on picnik (before it's demise) and mostly kept it neutral in a soft grey.
I added a tiny bit of dark plum as that was the bride's favorite color. 

And it printed beautifully :) 
I always get a bit giddy when it comes out of the printer looking great- it's always a shock to me that it works!!

Isn't the texture of the linen so perfect with the words? 


To attach it to the wooden door, I first hot-glued the linen lightly to a cut piece of burlap. 
I didn't want the burlap to be perfect (which is hard anyways) so I frayed the ends to give it that disheveled feel. 

Then I used some small upholstery tacks on each corner to nail the fabrics into place. 


And there you have it :) 
I'm absolutely in love with how it turned out. 


I love all the mixtures of texture. 
Soft linen, rough burlap and the smooth wood. 
Plus you can't really go wrong with the white paint contrasted against the always-fabulous burlap. 

Mmmmmm. Perfect combination. 
Plus I so love that verse. 


Enough talk for now. 
Just some eye candy :)


I've been thinking about making one for us too...
I really need to do that...


What do you think? 
Is it the perfect combination for a perfect couple somewhere??

I'd love to hear your thoughts- I haven't talked to you guys in forever it feels like!!
Do you have a bunch of weddings coming up too??


....................................

Keep checking back this week- I have a fun twist on the old 'utensil gift' coming up!!


Pin It


post signature

Linking to: