Pages

April 30, 2012

Guest Post: Four Marrs & One Venus (Scrabbled out Address Plaque)


Hi there Tattered and Inked readers!
 I am so happy that Kelsey asked me to come on over and hang at her place today! First, I LOVE Tattered and Inked, Kelsey and all her amazing projects- I would be absolutely Crazy to pass up this opportunity! 
So, Thank you once again girl for having me!
Here is the 4-1-1 on me:

My name is Jen

I have been blogging for 4 months now and LOVE it! 
Over at my little space you will find 3 cute boys and 1 Stud!
{and of course, recipes, crafts, this and thats}


Today I brought a little something special to share with you!
Now when I think of Tattered and Inked, 2 things come to mind:
Spray Paint
&
The Color Teal

{Am I right?}

Kelsey turned me on to Spray Painting, and I can't get enough of it!
I dare you to try it once. just once. and the next day you will have that can out again, spraying something else. It is that addicting...and she did warn me, but I just Love what it does! I am addicted.

So...
I have this problem.

You see ever since we had the house painted {over a year ago} we never put the address numbers back.

My mind got to thinking, and then my hands to creating!

Scrabbled Out Address Plaque
Say What?


And Then...


AND all done!


Set that baby up out front, with some Blooming Pals-and Wa-laa!

Hope you all enjoyed this little creation! You can find me and all my other fun creations over at my little Space, so feel free to come over and say hi!  

Thanks again Kelsey for having me today, I really enjoyed being here!


April 27, 2012

Wrapping it all up: Wreaths, Doors & Printables


We've reached the end of what I have to offer superhero-wise!
(At least for this party!!)

This was my favorite party to do so far since there were so many fun things to do with it!
I had a couple little things I wanted to share with you to wrap up Superhero Party week here :)

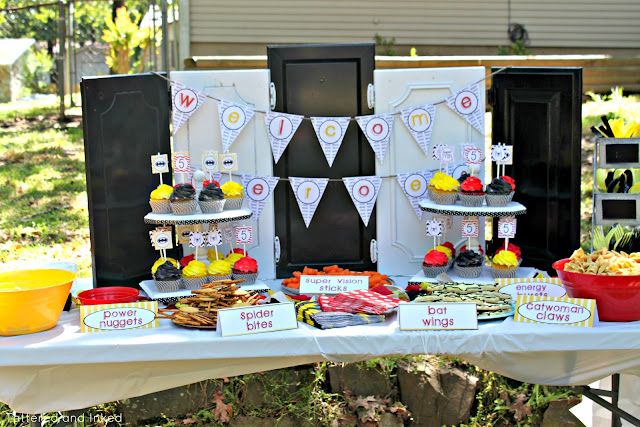
Remember my door backdrop for the food table?


I'm a TOTAL cabinet hoarder and I literally have close to sixty cabinet doors stacked in my garage.
But I use them for e.v.e.r.y.t.h.i.ng.
And they were perfect for making a somewhat foldable backdrop for the table.


April 26, 2012

Superhero Printable Banner!!!


So I'm back for our last little get-together for the day!!

And it's a quick one but so fun :)

Remember this set-up from my superhero party??


I wanted a cute banner to hang from the cabinet door backdrop but didn't have a lot of time to get one made.
So I decided to design a quick printable one and I looovvee it.
It was super quick to get done and didn't lose any of the cute factor just because it was printed.
At least to me it didn't :)


I spelled out "Welcome Heroes",  printed out each banner seperately and punched holes on either side of them at the top.
I used twine to string them from the cabinet doors.

And you know I wouldn't leave you hanging, right?

So I'm including links to download each letter.
Make sure you get enough of the ones you need- the e's are both used twice and so is the red o.

I printed mine as 5x7s so I could fit two per sheet of cardstock.


Click below to download:


Printables are intended as gifts for Tattered and Inked readers only.
As with all my free printables,
these are for personal use ONLY.
Please do not claim them as your own or alter them.

I so hope you enjoy using these printables!!
I know they sure made preparing for the party a little easier for me but still gave me a little extra fun factor that I wouldn't have had time to do otherwise :)

What are your thoughts about using a printable banner?
Does it lose too much of the cute, handmade factor to you?


Hope you guys have had a great day
I'll be back tomorrow with some more superhero fun!!
'Nite guys- I'm off to study for my LAST final!!


*****
For a full list of all my superhero printables, visit the bottom of
this post.

Pin It

post signature


DIY Wooden Cupcake Tower


Cupcakes seem to be all the rage right now, don't they??

We had cupcakes last year for little man's party and this year he wanted them again and I was totally fine with that!
Because I really really wanted an excuse to make a cute cupcake tower.

Last year, for the pirate party, I went the whole plate & candlestick tower route.
But I wanted something a little more durable & not-so-scary to store this time around.

Plus, I may have used some of the cute striped plates from last year on my plate wall...
so we needed a new cupcake tower!
Enter the DIY wooden cupcake tower...


I have some awesome scrap banister pieces from when my parent's remodeled their house that I had been dying to use.
So I built my idea around them and went from there.

Here's what I gathered:


(I'm telling you materials for ONE tower, I made two. So if you want to make two as well, make sure to double what's on the list)

Materials

*One Rectangle Unfinished Wood Piece (Hobby Lobby)
*One Oval Unfinished Wood Piece (Hobby Lobby)
*Long screws (I used deck screws)
*Four feet (I used generic wooden knobs)
*One mini wooden candlestick (Not pictured)
*One Wooden Ball (Not pictured)
*Candlestick/Banister for middle piece
(I used my banister piece, but you could use a regular wooden candlestick instead)  


I was just trying to use mostly what I had on hand which is why I used wooden knobs as feet.
You can be creative with this and use blocks, large beads, spools, etc. for your feet.
I just loved how they looked like mini bun feet on the bottom :)

They were going to be painted, so it didn't matter what color they were, as long as they were the same shape. 


For the middle section support, I used one of my banister peices and made cuts to get the piece I wanted with my miter saw.


For extra support (I wanted them to be pretty durable)
I used long screws to attach the banister piece to the bottom level and the top level.
I just screwed the bottom piece from underneath and the top piece was going to have an embellishment on top so you wouldn't see the screw when you were done.


I used hotglue to add the mini wooden candlestick and wooden ball to the top.
Just to look pretty :)

Then I painted everything white.


Lastly, to get a cute finished look on the edges, I used some washi tape!
I LOVE this stuff and found mine at Target.
It's basically a paper tape so it's really easy to peel off if I ever get tired of it or want to change it for different events.


I went around both the top level and the bottom level edges and just smoothed the tape down as I went.

The little knob feet were painted white and then hotglued on too.

Not too bad, right??
And a way cute place for your cupcakes to sit...


There's a million different ways to make your own...just be creative and look around at what you already have!
You never know what's lying around, waiting to be turned into something fabulous!!

I love these towers because I'll be able to use them over and over again.
Plus I can change the colors whenever I get tired of the black and white tape.

What do you think?
Do you need a cupcake tower for your next party??


Pin It

post signature

Linking to:


Superhero Invites & Swag Bags

I could seriously spend about two weeks sharing superhero-themed posts!
So cramming everything I want to show you into four days is TOUGH.

I did so many DIY projects for little man's birthday to try and keep thing personalized (and cheap of course!) so if it's too much superhero overload...I'm sooo sorry!!

But it's kinda fun too :)

I shared some fun superhero food ideas yesterday after the big party reveal...
and I've got several posts coming up today to share all kinds of goodies with you!

Up first...getting your heroes to the party and some fun superhero swag bags!!

I surfed all over the internet for some inspiration for superhero invites and there are tons of ideas out there!
I ended up playing around on picnik one afternoon and came up with this:


I made the background from all kinds of superhero comic words and ended up printing a strip of that right onto the envelopes as well.
I had to make my computer really love me in order to coax it do that correctly.
But I love how they turned out!


April 25, 2012

Superhero Food Ideas & Free Printables!

Did you get a chance to check out my superhero party post yesterday??


Cuz if you didn't, you should definitely check out all the super-awesome fun we had going on!
I told you I'd be sharing details of the party throughout the week and I'm definitely trying to do that in between packing to leave for two weeks and finishing up all my finals!!

So sorry these posts are coming up a little later than usual...
it's craziness, people. Just craziness.

Anywho, today I wanted to share with you some....


This part of party planning was probably my favorite this year.
Little man had tons of fun coming up with fun ideas and we both got to go 'superhero food shopping' which he thought was the coolest thing ever!
I found some great ideas via just google and then we came up with some on our own.

So here's what we came up with but making food 'super' is all in the imagination so think of your kiddo's favorite foods and put a superpower spin on it to see what you can come up with!


(I bought three big jugs of green Hawaiian punch and man did we go through some drinks! Superheroes need lots of hydration!) 


I mentioned in the original post that I got the way cute cupcake liners from Hey Yoyo on Etsy!
So cute and I just slipped them right over the store-bought cupcakes.

Printables for the cupcake toppers are coming later :)


I was surprised that these guys were the biggest hit of the snack food!
These were also the ones that little man told e.v.e.r.y.o.n.e. about before the party.
He was fascinated about having 'catwoman claws' even though he had no idea what they were-haha!


These were so fun to make!
I prepared them the night before and little man loved helping to make the spiders.
They're yummy everyday snacks too...just sayin'.


I found a way cute batman-shaped cookie cutter on Amazon and me and my mom whipped up some cookies a couple days before the party.

We used lemon icing for the yellow and they were yummmmy.


Like how I sneaked some veggies in there?
But little man actually really loves carrots so they definitely were chomped down on :) 


Little man insisted that chicken nuggets had to make an appearance at the party and McDonalds has a 20-count box for 5 bucks.
I'm good with that :)

So now onto the really good stuff!!

I designed some super easy food labels to set out on the food table and thought you might want in on the action.

Just download, print, cut out, & fold in half for a way easy pop of color and a 'super' food table!!

(I printed mine out as a 5x7 so I was able to get 2 per sheet of paper on my printer)

I mixed and matched with my two designs for my table so it's totally up to you on how you want to do it!
I also have links to blank food labels so you can add your own names!!

So have at it & I hope it helps in adding a little awesomeness to your own superhero parties!!!


Click below to download:


Click below to Download:


Printables are intended as gifts for Tattered and Inked readers only.
As with all my free printables,
these are for personal use ONLY.
Please do not claim them as your own or alter them.


I'd love to see how you use them!!
Feel free to send pictures to
tatteredandinked@yahoo.com


Hope you enjoyed some fun superhero themed party food and it got your own creative juices flowing!!
I'll be back tomorrow with some more superhero fun!


*****
For a full list of all my superhero printables, visit the bottom of
this post.


Pin It

post signature

Linking to:


April 24, 2012

Superhero Fifth Birthday Party!!

Hooray for a successful birthday party!!!

That's totally how I feel :)

I love putting on a good party but goodness, these past few weeks have been ca-razy with all kinds of chaos.
I'm still shocked that I was able to get everything done.
The actual party went by in a whirlwind, which it always seems to do.
You spend weeks preparing for it and then it's over in .2 seconds.
Or so it seems :)

Anywho.
I thought it about time to show some of the superhero fabulousness that went on at little man's fifth birthday party this past weekend!
Are you ready for some super awesome pictures???
I hope so- cuz I've got lots of 'em!!

I'll be sharing more indepth parts of the party throughout the week.
I totally had to take yesterday off from posting to prepare for my finals this week.

So expect some fun printables, food tips & some of the ideas I used in the next few days :)
Aren't you super excited???

So! Onto the fun...


April 13, 2012

Another Blue Makeover

I've never been so happy for Friday to be here...
it seems like each week drags more & more.

Althought the catch 22 is that it also seems to never let me have enough time to get things done.
I've got finals & projects like crazy right now and keeping up with blog posts plus planning for little man's party in a week is about to have me falling asleep at the keyboard.
Not going to lie.
I'm completely worn out.

So just a quick before/after tonight and then I'm curling up in comfy clothes with hubby and probably falling asleep during whatever movie we put on :)

Here's hubby's end table before:


It's a piece I've actually already redone before.
A lovely I picked up from Habitat last year.

I love the lines and the white glazed finish was perfectly fine.
But of course, it had to match :)

So it turned blue.
It was a super quick transition.

I sprayed it down with Blue Ocean Breeze and then sealed it with some clear wax.
The hardware got spritzed with gloss white.


Hubby says he liked his white one better.
And I totally saw that coming.

But he hasn't seemed to mind his little blue table.
Besides his little comment that it now looked like 'a Tiffany box'.
Which made me happy :)
What girl doesn't love having Tiffany's in her room??


I really hope you've enjoyed checking out all things master bedroom this week!!
It's been so exciting sharing such a huge project with you guys.

It's definitely one of the projects I'm the most proud of :)

In case you've missed any of the previous posts, you can check them out below:


Love you guys and I so hope you have a great & restful weekend!
We have opening day for Tball in the morning and I'll be working on all kinds of superhero b-day projects :)

See ya Monday!!!


Pin It

post signature


April 12, 2012

Dresser Redo for Master Bedroom

I told ya I'd be back later today :)

Now before anyone scrolls down and sees my little dresser before it was painted and gasps in horror that I would want to paint it...

let me tell you.
It looks in a lot better shape than it really was.

We got it as a set when we first got married from JC Penney.
It is a nice dresser and I love it lots but for some reason, the top of it just attracted scratches and who knows what else.
It was marred all over and I was so tired of looking at the gross top, I tried to cover it up with a runner of sorts.

And I hated that.

I DID go back and forth about painting it but finally decided that it mattered more that I would like it in the end than whether or not I thought it was bad to paint it.
So please don't hate me.
It's pretty now. Promise.

So here's the before in the old room:


It is that pretty dark wood that I love but like I said, the top was yuck and the room desperately needed some lightening up.


It was the first project we tackled after painting the entire room.
We dumped it's contents all on top of my bed (that was fun...)
and then took all the drawers out outside.
It was a pretty day so it made painting easy and quick :)


My biggest tip for painting a big piece like this is to use a nice roller on all the flat parts.
It makes it go quick and you won't have to worry about brush strokes as much.

I love my Cutting Edge Stencil roller so I used it on the top, sides and the drawer fronts.
I was lucky to have a dresser that didn't have a lot of detailing in it except for on the corners.

I painted it in a Sherwin Williams sample in Snowbound.
A soft, pretty white that went on super creamy.


After I had a couple coats on,
I took some fine grit sanding paper and went over the edges and corners with it.

I wanted a nice, distressed look and this piece was made for it, let me tell you.
I was getting giddy as it was all coming together.
It was just absolutely meant to be white.

I distressed it until it made me happy and then sealed it with a clear wax.


Ooh. Isn't it pretty??

The white brought out all it's gorgeous lines and those beautiful pillar-type corners it had.
You never even really noticed them before.


And I actually put the hardware back on backwards.
Totally on purpose too.

The fronts had a design on it that almost resembled the Confederate Flag.
Weird.
The backsides were smooth so I flipped them when they went back on.
And they pop so much more now.
They were completely lost on the dark wood before.


You can tell the GINORMOUS difference in the before & after of the room.
So much airier and happy, huh??


I will totally admit that I was nervous painting a piece that was in fairly good condition,
but I am so so so glad that I went with my gut feeling.

It makes me smile every time I walk in the room.
Nothing like a nice fresh coat of white paint to freshen a room up!!!


Tell me, tell me,
are you mad that I painted it??

Or do you agree that it was totally destined to be white??

******
In case you missed the room reveal & all the fun that went with it, check these posts out:


Pin It

post signature

Linking to: