Pages

February 29, 2012

My Charming St. Patrick's Wreath

It's March 1st tomorrow!!!
Can you believe that February is already over??

I'm excited because March means spring break...and my bday :)
So it's always a fun month.

What are you most excited about for spring???

I love St Patricks Day because it's the first holiday that really starts bring spring colors in.
I love seeing fresh green everywhere and since green isn't usually in my colors, I love getting the chance to play with it!!

I'm not big on spreading 'luck' everywhere so I racked my brain trying to come up with other words that could be used for St Pattys...

and I guess you'll have to wait a sec to see what I chose :)

I decided to go with a different wreath base this time around because I had a fun grapevine wreath kicking it in my garage from Goodwill.
A mere .50 cents.
Love a good steal!

And amazingly enough, it didn't even have anything hideous to pull off of it
 (which is usually the case)
It was just in plain, somewhat shabby, form.


I trimmed him up a bit and then got out a ton of supplies.
Does anyone else craft like this?
I usually get out pretty much anything I could see myself using and then get to work.
I use probably about a 1/4 of what I get out...but I can see everything and know what works and what doesn't.
It's my little process :)


I ended up using just a few things to make my flowers and embellishements:
*Green T-shirt
*Sheet Music
*Twill ribbon
*Wooden Discks
*Scrapbook Paper
*Green printed Ribbon
*Buttons

I used the t-shirt, music sheets and scrapbook paper to make my chunky four-leaf clovers.

The covered circles were some wooden discs I had that I wrapped the twill ribbon around and hot glued.
I had fun making different flowers and clovers and then hot-glued them to the wreath.


Since the grapevine wreath was more of an oval shape, I wanted to add something to the top too.
Cue in my St Patty's word I wanted to put on there.
I finally decided on 'Charmed' because I just kinda of adore that word :)

Doesn't it fit perfectly?


I made a fun little pennant banner out of scrapbook paper and then used some chipboard letters that I inked black to spell out 'charmed'.
The twill ribbon worked perfectly to string the little mini banner.

Aren't mini banners the cutest?


I 'm in love with all the textures and colors of green :)


Though these grapevine wreaths are finicky little creatures.
I don't think they're big fans of having things hot-glued to them :)

I had to work with it a bit to get all the pieces to fit nicely and not just fall off the crazy vines.

I ended up looping the ribbon on the banner through the vine and then hotgluing the ends together.


I think he turned out charming, don't you?

Have you made any fun St Patty's day projects recently?

*********************
Tomorrow is March 1st which means that Google Friend Connect is offically leaving all non-blogger blogs!!

Even though I'm hosted by Blogger, I'd love for you to follow through any of the other ways I have available to you:
rssfeedgoogleplus symbol

pinteresticon

Have a great Wednesday!!


Pin It

post signature

Linking to:


February 27, 2012

Heading out of my Comfort Zone: Two-Toned Dresser Redo

Whew.
It's been a day.

And most definitely a monday.
Sorry this post is getting up so late...
Just a bajillion little things that led to having no time to sit down and chat it up here.
Until now :)

I've been dying to share my newest furniture redo with you guys and see what you think.
I'm pretty used to keeping it simple and within my 'comfortable' color schemes.
So I was excited to go outside my comfort zone and go in a different direction than I usually do.

A friend of mine offered me this dresser when her parents were moving and getting rid of some of their childhood stuff.
This dresser had seen better days so it came to live in my garage :)

Check it out...


So this guy hung around a bit until the weather finally allowed for some good painting to happen.
It took a bit for inspiration to hit but thanks to the back-up I got from my Facebook friends,
I decided to go with the beautiful grey I picked up at Habitat for five bucks.

I love the slatted design on the tops and sides.
And the grey was the perfect, silky hue for it.


While the first coat dried, I played with the hardware.
Changing the hardware wasn't much of an option for this piece considering I would have to do something about the giant holes that they live in if I did.
So I stuck with the original pieces.

The color scheme I had in my head didn't scream oil-rubbed bronze.
So I decided to just glaze the original brass.
It ended up with a nice worn look that I loved!

I used some black acrylic paint, brushed it on, and then gently wiped it off.
I didn't really wipe it off much to leave the look I wanted.
Once it dried, it was good to go.

Want to see the difference?


This is where I strayed off my normal path.
Usually, I'd go all one gorgeous color, maybe some distressing and glaze.
Or possibly some white accenting.

But I really liked the idea of keeping some of the wood color around.
But I wasn't head-over-heels in love with the color of the original wood.

So I decided to tape off the middle insets of the drawers after I painted them.
I painted the edges the grey color and then used painters tape to tape off the middle part.

I did let the grey paint dry overnight to keep it from lifting the paint right off though.


Here's where these guys came into play...
some of my favorite go-to helpers to get the job done :)


I used the pre-stain conditioner to prep the wood after I gave it a good sanding.
Then I brushed on my dark walnut mixwax stain.

Here it is after a couple of coats:


Ok.
So I did something crazy here.

Bear with me.

I decided that even with the walnut stain, it wasn't giving me quite the rubbed aged look I was going for.
I stomped around a bit trying to decide what was bothering me and then it hit me.

Umm. My favorite thing in the world.
It needed glaze.
Duh.
(that was my internal monologue in case you were wondering)

I brushed the glaze on and oh.my.gosh. I was in love.
Head over heels love.

Now, I'm not going to go crazy and do this on every piece from now on, but it was the perfect touch that this guy needed :)

Go ahead.
Check out the difference for yourself and tell me it didn't make it look a bazillion times better!


I popped the drawers back in, took my sander to it for a few minutes to give it a good distressing then sealed it with a protective wax to give it a buttery, satin feel.

Check him out now!!!!


Ahh!!
Isn't he soooo good-looking??


I admit, I was nervous there for a bit about how it was going to really turn out but it looks so much better in reality than it did in my head!!!

Don't you love it when that happens??


And just in case you need another glimpse of it's humble beginning, here's a quick reminder...


I'm in love with him.
And I hope someone else is too because, sadly, we don't have room for him in our house.

So he'll be finding a new, fabulous home to live in :)
(Why is it a he?? Really. Who knows. It's how I picture it.)


So spill it you guys.
I'm anxious to hear what you think about my newest venture.

Loving the two-toned or is it not quite your cup of tea??

I have a ton more furniture redos coming up so gear up :)
And I hope you're as happy as I am that Monday is finally over and we're that much closer to spring break!!

Love you guys :)
'Nite.


Pin It

post signature

Linking to:

February 24, 2012

Painted Duck-Cloth Pillows

Ooh, it's starting to feel like Spring around here guys!!!

We've had blue skies, 70-degree weather and gorgeous sunshine the past couple days and I am in LOVE.

Completely ready for spraypaint, capris and sunglasses season :)
How 'bout you??

I've been working on several furniture redos that I'm dying to show you...so be on the look-out.
You can see some sneaks as to what they are on my facebook page.

Onto today's project.

I have a slight love affair with pillows...
I'm pretty sure I'm not the only one with that love affair though.

And these ones I actually made :)
No stuffing placemats this time!

Wanna see what I came up with??


I had fun :)

Supplies:
*A yard of Duck Cloth (I got contrasting colors- a beige and dark brown)
*Sewing machine
*Stuffing
*Acrylic Paint
*Foam Pounces
*Stencils of your choice


I love this stuff.

I first used it back when I did my kitchen stool makeover and I'm super impressed with how it holds up- especially since a four year old eats there regularly!!
I swear, we spilled a big amount of spaghetti sauce and it came up!
So you know it's amazing :)

I found mine at JoAnns fabric and the label calls it 'duck cloth' and it just feels like drop cloth material.

So I picked up the two colors in enough yardage to do a couple pillows.

I decided I wanted to glam them up a bit with some vintage-y type painting so I printed out some stencils.


Oh yes.
I still love the whole 'keep calm and carry on' slogan and used it to inspire my 'be calm' pillow.

All I did was print out the designs, cut them out with my exacto knife
(yes I STILL do this even though I've entered about a bajillion giveaways for a silhouette. Sigh. Someday...)

I then used regular old acrylic paint to stencil them on with a little round pouncer.
Works like a charm.
You can also pour a little fabric medium into your paint to make it a bit softer but these aren't really for laying on so it didn't really matter.


To make my "H" pillow, I painted the H on and then used a paper doily I had to get the circle imprint.
I just laid it on the cloth and pounced some paint into the design.

Added a little bit of pretty :)


Once I was done painting, I got the sewing machine out and whipped some pillows up :)

I love the contrasting brown on the back!!

Here's my 'be calm' one in all it's glory:


Isn't he cute?
I took some fine-grit sandpaper to the paint to rough it up a bit to give it more of a vintage feel.

And the same to my little "H" pillow:


I just love them!!
I always love having a fun pile of pillows and these are a fun addition :)


What do you think?
Need some more vintage pillow eye candy in your life??

&
Are you excited for Spring like me??

Pin It


post signature

Linking to:
Weekend Wrapup Party @ Tatertots and Jello
Sister Sunday @ Sisters of the Wild West
Saturday Seven @ Positively Splendid
Sundae Scoop @ I heart Naptime
Get Your Craft ON @ Today's Creative Blog


February 15, 2012

I'm hanging here...

I'm hanging out over at The CSI Project again today :)

I love posting over there and seeing all the fabulous contests they have each week.
This week we used some sponsor material and I think you'll love who it is!

Visit thecsiproject.com

So head over to check out what I did with the fun items!!

Happy Wednesday!!


Pin It

post signature

February 10, 2012

More Fun Valentine Printables!

Valentine's Day is right around the corner?
Are you ready??

I think V-day around here is going to consist of treatment plan writing and maybe a quick dinner to one of our fave places- PF Changs.
But OT school doesn't seem to be wanting to share the love for the holiday at the moment :/

Lots and lots to do.
Sigh.

But just in case you're needing a few more ideas for Valentines, you've gotta check out this fun site!
Talk about Valentine eye candy :)


Mooo has tons of free valentine's printables up for grabs!
Plus you can sign up for their Mooo club to recieve news of all their awesome prints they put out!

I don't usually just post about a website but oh my gosh- the cuteness!!!

My personal favorite is the 'I love you to the moon and back' tag...


So just in case you're needing some more valentine freebies...
head over and check them out!

Hope you guys have a fabulous friday!!

Oh, oh oh!!I'm having a Facebook Fans only Giveaway over on my Facebook page so you should definitely head over to check it out :)


  Pin It

post signature


February 08, 2012

Jenga Love Blocks

Sooo...
I have a thing for jenga blocks.
Yup, I said it.

Not just jenga though.
Tumbling Towers, Falling Bricks...whatever you want to call those cute little wooden blocks,
I love 'em.

I've shared my obsession with these blocks in a couple projects here and here.
But this is the simplest, prettiest little project with them ever.
And I heart them very much.

Check out these cuties:


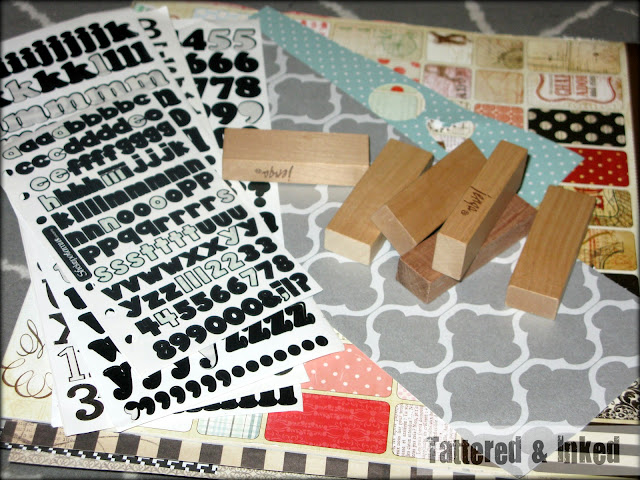
I put on my scrapbooking hat and dug through my old 'stash' of sticker letters and my ever-growing pile of paper...


and I started covering them up.
I wanted to keep the edges exposed because I liked the idea of the raw wood showing through...

The easiest way I've found for covering things is by lining the paper over the piece and then bending the paper around the edges to make a nice crease line.
That way I know exactly where to cut.

For these, I cut a little inside the crease to make sure the edges show.


I used one of my adhesive staples, mounting squares, to adhere the paper to the blocks.
I always seem to have bad luck with Mod Podge when it comes to small surfaces and thin paper...

so this stuff worked like a charm. 


I used sticker letters to make phrases on one side of the blocks...
and then used my old friend for the other sides...

my little label maker :)


Of course, little man jumped in on the action and decided he needed an impromptu photo session.
I take advantage of these whenever he's willing cuz soon, I'll have to beg him to be in front of the camera.


And then I took them outside for their little photo shoot...


In love.
I'm obsessed with how these pictures turned out...

don't be jealous of my blue chippy chair :)


No really, you probably shouldn't be.
The poor thing is falling apart.
Because dumb me didn't spray it with weatherizer.
I have plans to try and keep it around a little longer though.
Pwomise.

Here's the other sides with their sweet 'words of love'...


I have a thing for imperfections.
Probably because I know nothing we do is perfect so I like it when
imperfections show themselves as beautiful.

Like this little block...
Perfectly imperfect.


And my whole little stack of love blocks...


After this picture, they all came tumbling down.

Oh well,
 you can take the blocks out of the Jenga but you can't take the Jenga out of the blocks.
Don't try to make sense of that.
Just go with it :)

What do you think?
Have I convinced you to keep an eye out for old Tumbling Tower games?

I'm off to see what I can do with the rest of them...
Happy Wednesday ya'll :)

Pin It

post signature

Linking to: