Pages

March 29, 2013

Happy Easter Weekend!! (And a handmade sign)

This week has been hectic. 
And bittersweet. 

I finished up my first three-month clinical at an amazing Pediatric Clinic and I'm super sad to be leaving there to go to my next clinical site. 
I'm excited that it's a big step forward towards finishing OT school though.
But it's hard to leave a place you love :/ 

Tying up all the loose strings with that and then having Hubby get sick in the middle of his crazy school week has left this week a tad exhausting.

But in all the craziness and stress...in all the business and chaos...
it's never too crazy or stressful to remember that today we celebrate something bigger than all of that :) 


I made this sign for a friend of mine but I love love love the simple message. 
That cross sure means a lot to me :) 


After this crazy year, it's so nice to know without any shadow of a doubt that we have a Savior that cares :)


So I hope you guys have a fabulous, sun-filled, jellybean consuming and God-blessed Easter weekend with those you love!!

We will be celebrating with a fun Easter Egg hunt if the weather allows and then spending Easter with family and yummy food. 
Have a great weekend guys!!! 


post signature


Pin It

Like me on Facebook. Follow me on Pinterest. Subscribe to my feed


March 27, 2013

Garden Bench Redo

Well I'm here to deliver on the promise to share the bench's transformation with you!! 

I found this sad little bench on the side of the road.
But it was sturdy and I could see loads of potential.
Hubby wasn't as sold but we lugged it home anyways. 

I had every intention to redo it and sell it but it was way too perfect for our garden space.
So it stayed :) 

Here's what the poor thing looked like before a little spraypaint & fabric magic: 


Supplies: 
*Sandpaper (I used 120 grit)
*Spraypaint (Rustoleum's gloss white)
*Outdoor Fabric (Hancock Fabrics)
*Clear Gloss Sealer (Krylon)


First things first, I fixed the little dowel issue it had going on.
I tried just prying the one in the middle out by hand but it wasn't budging.
I ended up taking my jigsaw and cutting it out at the bottom. 
Then I popped it into the other hole and use wood glue to secure it. 
Easy peasy. 

Next, I gave it a good sanding to get any grime and scatches smoothed out. 
The thing I loved most was how sturdy it was. 
Definitely a key thing in picking up random pieces. 


I'm pretty darn sure this thing was handmade and the seat was a bear to get off. 
It was nailed in so I had to use a hammer to tap it off. 

But it was super easy to reupholster after that.
I got rid of the crusty & dusty old fabric and kept the foam underneath.
I made sure to get outdoor fabric since it would be living in our garden. 

Isn't it gorgeous all put together?? 


I gave it two coats of white spraypaint and then sealed it with a clear gloss coat to help protect it. 


No matter how many pieces I redo, 
I don't think I"ll ever cease to be amazed at what a little paint and fabric can do. 

She just glows now :)


I think the hardest part for people in redoing pieces is looking past what it looks like right then and being able to have a vision for it. 

The key things that made me pick this piece up and rescue it were: 
1. Sturdiness- makes my job a whole lot easier if it's already stable and secure
2. The only missing parts were a couple dowels and I knew I could make that look fine. 
3. It could easily be reupholstered which makes a world of difference. 
4. It was solid wood- score!


It has a perfect home now in our little garden :) 
My neighbors have already come over to take a rest in it too. 


I took hubby with me to the fabric store (gasp!) and he actually is the one who noticed this chevron fabric.
He's such a keeper :) 


Need a reminder of how far it came?
You know I've got you covered with a before & after :) 


From depressed & dreary to gorgeous & cheery.
Best kind of makeover!!

What do you think of my sunshine-y bench? 
Want to come & sip tea with me? 


You can check out a gallery of my other furniture before & after's here for more inspiration!


post signature

Pin It

March 25, 2013

Garden Transformation: A Happily Ever After Tale

Really, I'm not. 

I kinda shudder at the thought of showing you the before pictures of the little flower bed that was such a nightmare before. 

You see, it's the flower bed in the front yard.
As in, the first thing you see when pulling into our little driveway. 
Besides the green shutters...and cute wreath on the door :) 

And I've been wanting to get my hands on it...rather, in it, for the past three years. 
But it was a project, guys.
And I've never been a plant person. Or much of a dirt person. 
I have a black thumb & plants usually don't survive with me... even when I'm incredibly well-intentioned with them.

But it took my sweet hubby looking at me a few weeks ago and saying 'hey, what are we going to do about that?' and jabbing his thumb over to the eyesore that I had been pretending really didn't exist. 

Shameful look from me. 
"Well...I guess we should make it look better....?"

And we kind of just stared at each other for a minute. 
Should we really tackle THIS project in our first month of marriage? 
Sigh. 
And so we did. 

We waited until it was a random/weird occurance of 80 degree weather last weekend and we ripped that poor area apart...and then put it together again. 
Just like Humpty Dumpty. 
Except for prettier...and with flowers :) 

Are you prepared to see what we were working with? 
Just remember that it really does get a happy ending...


Ignore my hoarders garage and focus on the dying plants :) 
I think we were mainly inspired by the sweet daffodils that bravely popped up among the barren flowerbed. 
If they could stand tall and be pretty...we needed to help them out a bit. 


Mr. Tree was trying to take over with all his roots and those poor azaleas just needed to be laid to rest. 
Not to mention the fact that the side of the flower bed had been run over so many times you couldn't even see the metal barrier anymore.
Sigh. 

It makes my heart hurt just looking at it. 

But after a long two days, a couple of sunburns, TONS of garbage bags filled with roots, leaves and weeds... we had our own little paradise. 
Don't believe me? 
Check it for yourself!!


Did you gasp just now?
Or is that just my reaction to it? 

Seriously, guys. I've never been so happy to open our front door and see brown mulch :) 

Here's what went into our little garden:
*12 Bags of Brown Mulch
*Four new pieces of metal perimeter (we were able to salvage most of what we already had)
*Weed mat (we salvaged all of it from the flower bed)
*3 Large Stepping Stones (Lowes)
*3 Small Gardenia Bushes (Local Market)
*Our own daffodils that survived (from Wye Mountain)
*Tree Slices (from old projects)
*5 new solar lights (Lowes)
*Various small flowers (Local Market)
*Repurposed Bench (Free & more on that later!) 
*2 Pinwheels for the kiddos (Target Dollar Spot)

All in all, we spent about 180$ on our little garden.
Which was completely and totally worth it to us. 
It was screaming for it. 


One of my favorite parts are the huge stepping stones. 
They are the perfect access to our cute bench and let the kiddos know where they are allowed to put those little feet. 


I added a hodge-podge of things from around the yard to accessorize the little area. 
Made me happy to have a pretty place to sit :) 


I can't wait to share more details on my free bench- you won't believe what it looked like before!!
More on that later this week. 


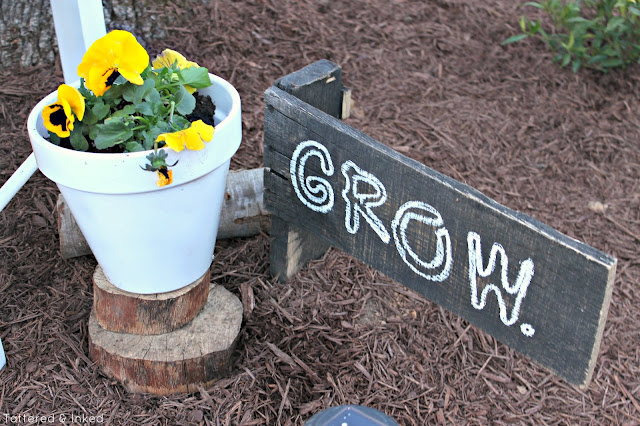
My little 'grow' sign was actually a flag the kids made from scrap pallet wood when hubby was working on our pallet cake stand
I asked them if I could make it into a sign and they loved that idea.
I added the word 'grow' in paint marker and stuck it in the ground. Love it!


Hubby made the kids a swing too out of an old 2x4 and some rope & chain.
The kids freaked out.
Now we can just sit and watch them swing away :)


The little white pot was just a terra cotta pot I found in the yard. 
I spraypainted it white and planted some flowers in it. 
I love it sitting on some of my tree slices I had. 


This is my favorite little nook in the garden. 
I stacked paint cans that I spraypainted and planted some pretty pink flowers in the top one. 
I just added dirt to weigh down the yellow one to keep them from toppling over. 
Large tree slices hold them up and I added some of Little man's treasures he's always bringing me home :)


I love seeing his special finds. 
Such a boy! 


I'm still amazed that pretty things could grow in our shabby garden. 
I think these daffodils were the complete inspiration for really putting the work in to make things over. 
Gotta love God's reminders :)

And just in case you need a reminder of how far it really came, 
check out the before & afters...


It's really amazing, isn't it? 
Now I feel like the outside of the house is starting to match the inside.
Which really makes me happy inside. 


It does my heart good to see pretty things & I love that I can walk out the door every day and smile at our little garden. 
Best two day project ever :) 
And a huge thanks to my sweet hubby for putting in the manual labor. 
He really does make all my dreams come true!!

And thanks to those little daffodils for inspiring us to get things in gear. 
Now they can live in their pretty new home :) 

What do you think?
Do you like my little happily ever after? 

Do any of you have a fun garden space? 

Check back this week to see the bench before & after- you'll love it just as much as the garden!!!



post signature


Pin It

March 21, 2013

"Happy Easter" Printables!

Where has the time gone? 

I feel like March just started and now it's nearly over. 
Eek. 

I sure hope the next three months of clinicals go just as fast!!

I'm keeping my fingers crossed for warm weather to come our way and stay because I sure am itching to get a lot of spraypaint projects done and Arkansas is NOT cooperating. 
Boo. 

So in the meantime, how about sending some free springy printable love your way?
Are you okay with that? 

I thought something cute and whimsical would do the trick so here are three brightly colored "Happy Easter" prints that would be fun in a bright frame or used as cute tags for those Easter gifts you might be giving :) 


Aren't they fun & just make you want Spring to come and stay a while? 
I hope you enjoy!!

To use in your own decor, just Click, Print & Frame!!
Click the link below for whichever print you love best: 


Printables are intended as gifts for Tattered and Inked readers only.
As with all my free printables,
these are for personal use ONLY.
Please do not claim them as your own or alter them.
For a complete list of all my free printables,  head to this page. 

To see past year's Easter Printables, check them out here and here!!


I hope you guys are having a great week...
be sure to check back in soon because I'm dying to share our garden before/after & my spring mantle with you!!


post signature


Pin It

March 18, 2013

Dollar Store Personalized Easter Baskets!!!

Guys, I am seriously over the moon excited about these cute little Easter baskets I made for the kiddos this year. 

And you'll never in a million years believe where it all started. 
Okay....so, yea, maybe you will...
Because somehow tons of amazing projects stem from this store. 
But seriously, it all went down at the Dollar Store. 

They had some way cute organization buckets on an end cap that caught my eye. 
I didn't actually buy any of them when I first saw them but I kept thinking about them. 
And thinking about them.
Like, I think they may have appeared in a couple dreams. 
Creepy. 

But nonetheless, I went back with visions of Easter cute-ness dancing in my crafty/weird brain. 

Check out these 1$ adorable Easter baskets I was able to create: 


Aren't they the cutest?? 
I had way too much fun making a girly one & then a more boy-ish one :)

Here's the cute bins I picked up at the Dollar Store: 
I got green for little man and blue was the girl-iest color they had. 


Complete supply list: 
*Dollar Store Buckets
*Scraps of ribbon/fabric
*Vinyl (I used white) but stickers would work too 
*Raffia
*Washi Tape
*White Eggs (.99 cents at Hobby Lobby) 

Besides the buckets & white eggs (which were not technically necessary), I had everything on hand which led me to my $1 Easter baskets. 
Score!!

First things first, they needed a little more personality. 
I pulled out my Cricut and some white vinyl and added some fun monograms. 
I used a scallop frame for sweet girl & an oval for little man. 

Then I just cut out various sized circles to add some dots around the rest of the bucket.
Easy peasy. 
Look how much cuter they are with a fun mongram!!


But it couldn't stop there!!
I took scrap ribbon & fabric and tied them around the handles of the bucket. 
Sweet girl got pops of pink and little man got more yellows & greens. 


Now for something cute to go inside. 
I loved the white eggs from Hobby Lobby because they were 1. cheap and 2. a blank canvas. 

All they needed were some fun colors of washi tape which just so happened to have gone on sale over at Pick your Plum & I had the perfect colors on hand!!


I did stripes on a few and then completely covered others. 
Just until I had plenty to fill those cute baskets. 

I added some raffia to the bucket & popped the eggs in. 
Instant gorgeousness :) 


Here's the sweet kiddos finished baskets, complete with washi-taped eggs!!


Ready for some easter eye candy? 
I know it's your favorite part :) 


What do you think?? 
Are you as in love with these cheap & way-fun versions of easter baskets?

Do you have some little ones in your life that would love a colorful easter bucket too? 


I hope you guys are having a fabulous week!!

It's spring break around here for my little family but not for me :/ 
But we're still managing to have lots of fun... just wait until I show you what we did in our garden this weekend!!! 
Happy Monday, friends :) 


post signature

Pin It