Pages

March 31, 2014

{Gender Neutral} Raindrop Baby Shower...with FREE printables

It's about that time, friends.
When all those invites for wedding showers & baby showers are flooding in :)

And since I'm all about all things baby right now I thought it was the perfect time to pull out a post I have been saving for a while.
It's the perfect spring/summer theme and it worked out great for us since it could stay gender neutral and our sweet friend wasn't finding out what she was having. 


But it would be incredibly cute amped up with blues or pinks if you want to make it go either way too. 

{All links to free prints throughout the post will be at the end of the post!!}

First off, what's a party without cute invitations? 


I made some cute yellow & blue raindrop themed invites to send out for the shower.
It would be super cute with pink font in it if you're wanting to make it more girly too. 

All links to the free printables will be at the end of this post, including these super cute blank invites!!!

For our shower, we added a comment in the invite to bring a book rather than a card so it could help add to her baby book collection. So fun! 
But if you'd rather not have that, there will be an Option A for just a regular invite. 

To welcome guests into the shower, I hung a white frame with another raindrop printable framed inside it.
I love keeping empty frames on hand to use at parties!!


The table was all glammed out in blues, yellows & whites and lots of yummy food!!


I made cute tissue poms & raindrop shapes from cardstock and hung them above the table for our 'clouds'. 


And a scrap fabric garland and a raindrop printable banner hung over the window above the table. 


I used bright yellow utensils and fun glass & white containers to hold everything. 
For a quick personalized bit of color, wrap colored ribbon around jars or bowls. 

I love my striped chalkboard sign I made forever ago and used chipboard letters to trace around to add 'Drip Drop Delights' to it to signify the food table.


And of course, I pulled out my DIY wooden cupcake towers for yet another fun party! 
I love these things and use them all. the. time. 
Find out how to make your own here


I found cute white ruffled cupcake liners at Michaels and made my own cupcake toppers with prints I made. 
(Don't worry, those free printables are at the end of the post too!!) 


One of my favorite things was coming up with fun names for the food :) 
I love cute food labels if you couldn't tell from my superhero party


I designed and printed out fun food labels after trying to come up with some 'raindrop-themed' food. 
It was a group effort, guys :) 
But we finally came up with some good ones!


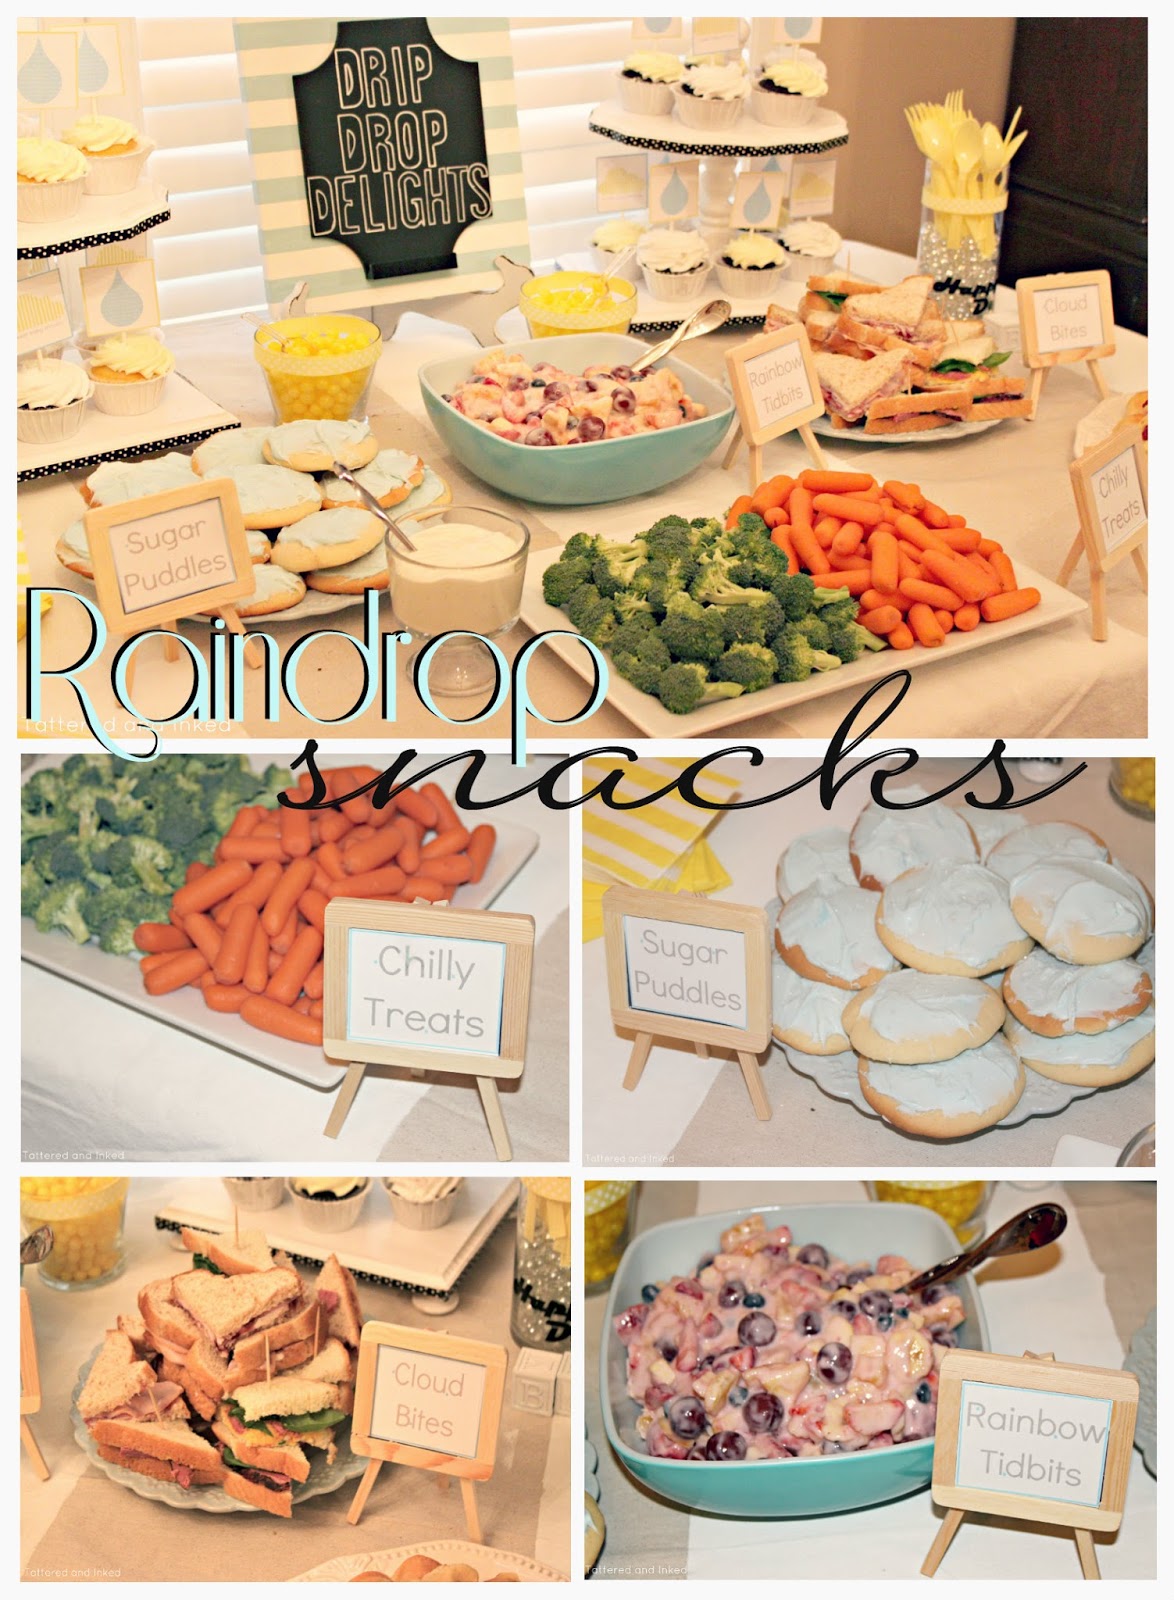
For some healthy choices, we used broccoli & carrots as 'chilly treats'. 
Iced sugar cookies became 'sugar puddles'
Small sandwiches were 'cloud bites' 
and fruit salad became 'rainbow tidbits'. 
We also made yummy lemonade and named it 'sippin' sunshine'. 


And of course we had the cupcakes and some yellow lemon heads on the table too.

And all the girls...


I love how everything turned out!!
Sweet & simple and ready to celebrate a sweet new baby :) 

Now onto the other awesome part....
FREE PRINTABLES!!!

You know you were dying for them!!!

------------------------------------------------------------------

Free Raindrop Shower Printables

So here is the deal. 
Just scroll down below and find the prints you want to print out. 
Click the link, download the free print and print out to your hearts delight. 

Please be courteous and only use these for personal use.
Do not sell them or change them up and sell those :) 
I work super hard and spend extra time to make blank versions of my prints for you to use so please be courteous and don't abuse them!!

Printables are intended as gifts for Tattered and Inked readers only.
As with all my free printables,
these are for personal use ONLY.
Please do not claim them as your own or alter them.
For a complete list of all my free printables,  head to this page

But, other than that,
hope you enjoy!!!!


Printable Raindrop Banner
{click letters below to download}

W  E  L  C  O  M  
(don't forget to print two e's and two b's!)
Just print the letters on cardstock, cut out and then use a hole punch or hot glue to attach to twine, ribbon,etc. 


Printable Cupcake Toppers
{click links below to download}


Print one or both designs.
My printer automatically allows me to print multiple photos a sheet and I choose the wallet size and make sure the 'fit to page' box in unchecked. These make the perfect sized squares for the toppers.
If your printer doesn't automatically print multiple per page, insert the image into microsoft word and copy/paste the image until a page is filled. You can also drag the picture to size it however big you want. Then print :) 

After printed, cut the squares out and then adhere to lollipop/candy sticks with hot glue. 
I get mine at Hobby Lobby in the party section. 


Printable Food Labels
{click links below to download}


Printable Invitations
{click links below to download}


I typically print invites as 5x7's on cardstock. 
Print, cut with a straight-edge and then round the corners with a corner rounder punch. 
Throw them in a blank white envelope (I get 100 packs of these at Office Depot) and add washi tape in a fun a color or just doodle the name on front :) 


Printable Door Hanger Sign
{click here to download}


post signature

Pin It
Like me on Facebook. Follow me on Pinterest. Subscribe to my feed


March 27, 2014

Gorgeous Planked Dining Room Table Makeover

It's been hit or miss around here the past week or so with how I'm feeling. 
The weather has been playing around which consequently means migraines for me. 
And migraines + pregnancy = no fun for me since I can't take my headache meds. 
Boo. 

So I haven't been up to getting posts together...hope you still love me :) 

I'm popping in to share with you an incredible furniture makeover. 
It was one that I had in my head for years and couldn't wait to put into action. 
But it required me getting a new table so I could replace this one. 

When hubby and I got married, he made another small dream come true (besides the huge one of marrying me!!) and brought his round pedestal table with him.
I've wanted a pedestal table f.o.r.e.v.e.r. so I was beyond thrilled.
That makeover is coming soon but it happily lives in our dining room now.

Which brings us to this once-gorgeous table. 


But it wasn't looking so gorgeous after years of wear and tear. 
The table itself is beautiful with good bones.
And we used it for nearly four years with no problems.
But I hated the glass inserts because crumbs got stuck in there, fingerprints ended up all over the glass and it just never looked clean.

Definitely not kid-friendly.

And the kicker was when one of the glass inserts ended up breaking. 
So we had a scratched-up, worn and broken table to work with. 

And these boring brown chairs I had hanging out in the garage: 


We can talk chairs first for a minute since they were a bit more simple than the table itself. 

I wanted them to be neutral to go with the table but still deal with the wear & tear that chairs typically get. 

So I grabbed a couple cans of glossy white spraypaint and gave them all fresh new white coats. 
Then I pulled out my sander and distressed them all to let some of the wood show through.
Which was not a quick task with all those spindles. 
Gah. 
I was glad when all that painting and sanding was finished :) 


But the end result were beautiful, fresh white distressed chairs which is always worth it :) 

Now, moving onto the more labor-intensive part. 
But I have to give hubby a huge shout out for this part.
Because his brain is so much better wired for measuring & doing all the detailed parts of 'building'. 
I'm the kind of person that just likes to eyeball and figure it out from there.
That drives him crazy :) 

So my solution for fixing the fact that the table was missing a glass insert was to create a whole new top for the table. 
Remember my beautiful planked dresser
I pretty much used the same concept...just bigger planks!


We laid the wood pieces on top of the table and traced from the underside to get the shape we needed. 
Since our table had lovely shaped corners, we had to utilize both the table saw & the jigsaw to cut the shapes we needed.

Then hubby used liquid nails and screws to adhere them to the top of the table. 

After the top was firmly attached, I used my favorite dark walnut stain to stain them a deep espresso color. Yummmm.


Oh and back-tracking for a second, the bottom of the table was spray-painted as well in a glossy white.
The original wood was a pretty dark color so distressing was perfect for it. 

Then both the top & bottom of the table, as well as the chairs, were given a good layer of finishing wax for protection and a smooth, buttery finish.

The top of the table got several coats of the wax for durability. 
Just make sure to read the back of the can for how many hours to sit between coats.
Then rub on, buff and voila! 
I love using finishing wax :) 

Then of course, we had to have a photo shot with the now-gorgeous set. 
Our house does not have a great spot for bigger pieces unless you want to see road or rock driveway. Ick.

But my parents have the perfect backdrop for setting bigger pieces up so, yes, we lugged them out there and set up a photo shoot with them.
Call me crazy but it was fun :) 


Can you believe it's the same table? 
I had to think for a minute about whether I actually wanted to give it up after it was finished.
But my pedestal table was calling my name so this one didn't make the cut. 

But it was fun to play with it for a bit :) 


I love love love the dark wood top against the white, distressed bottom of the table.
They compliment each other amazingly and make for such a pretty contrast. 


The shape of the legs & corners of the table help add in a gorgeous charm factor too. 
I'm a sucker for pretty legs :) 


Hard wooden chairs are not my personal favorite for dining room chairs but these are so pretty and rustic. 
If there had been a fifth one, it would have stayed with me for a prop or just to sit in a corner with a pile of pillows on it. 
Love how they turned out with a fresh coat of paint. 


Why, yes, we did have a blast getting pictures of our pretty little table. 
But in case you think the whole 'photo shoot' process is super glamorous or something...
here's a couple behind the scenes shots that show true life :) 


These were taken in the heat of the summer and, guys, it was hotttt.
So basically I had to strip down and climb in the back of a truck to get good shots :) 

But let's check out the before & afters and see how everything was completely and totally worth it...


And the grand finale....


Whew.
Lots of pictures :) 

But an amazing transformation, don't you think? 
I'd love to hear what you think- it was definitely one of my favorite pieces to do.

I'm so happy I got to finally share it with you guys!
I"ll be back next week with a way fun gender-neutral baby shower & bunches of free printables!!!

Hope your week has been happy & blessed!!!!

post signature

Pin It
Like me on Facebook. Follow me on Pinterest. Subscribe to my feed