The number one thing people say to me when talking about wanting to redo a room is that it seems too overwhelming and they have no idea where to start!!
I've had message upon message sent to me asking if they could send me pictures and get my advice on how to redo their rooms.
I love helping people out & giving tips to get them started in the right direction!!
But...don't get me wrong, I'm NOT an interior designer and by no means am I the perfect 'professional' to call the shots.
I'm pretty darn good at making a room look the way I want, but not everyone uses the same process to get good results!!!
But sometimes all you need is a little push & encouragement to get started with the whole thing!
Because I've had such an influx of room-related messages and emails lately, I thought I'd share some of the tips on how I get started and finish a room makeover!!
This is more geared towards working on bedrooms/offices and the like.
Big open areas like living rooms & kitchens are a horse of a different color.
These may not be how everyone does it & it may not be the perfect recipe for you, but it's the basic frame to how I start creating & it's worked out well for me so far :)
If you haven't been around long, I recently shared my daughter's room makeover where we transformed our new house's office into a beautiful, girly space.
You can check it out over here.
So, here's to diving in.
I'm going to give you six of the best tips I can think of for how to start in on creating a room that you'll love!!
1. Don't overthink your colors!
I think that this is sometimes the hardest part for most people.
They stare at paint samples, dig through magazines and scour the internet for all kinds of color inspiration. And they come out overwhelmed with too many choices.
I'll say this if you're looking at redoing a bedroom/office area,
pick colors that YOU love. Or whoever is going to be using that space loves.
I usually go with two complementary colors (like the coral & aqua in my girl's room) and then have at least one neutral that I'm going to use throughout the room. (I used gold & greys as my neutrals in this room).
If aqua makes you happy every time you walk into a room, don't be afraid to use it!!
If you're not a huge color person, use your neutrals on the walls & on bigger pieces, keep your bold colors limited to accessories & things you could easily change out (lamps, bedding, frames, etc).
Just be careful about how bright or how dark the color is going to be.
For Em's room, I used the coral color she loved on an accent wall and the other three walls had grey paint & tons of chunky white molding to help ground it.
The pops of aqua were found in the headboard & bench.
The rest of the 'big' items such as her vanity, end table, bedding & mirror were all a neutral but pretty white.
It helped keep the room grounded without feeling too overwhelmed with bright colors.
A couple other examples:
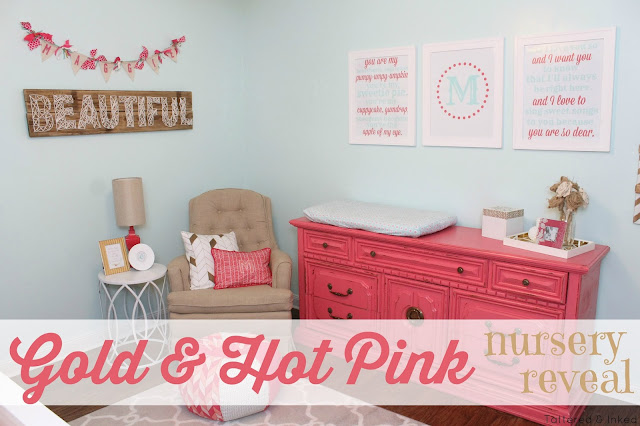
In the nursery, my main colors were mint & hot pink with gold & white as my neutrals. I also threw in natural wood tones for a neutral.
In my dining room post, aqua & yellow were my bold colors and the beige & white already on the walls were my neutrals. This room is an example of using your bold colors more in your accessories. My aquas came through in my dining room chairs, plates & small pieces of decor. Yellow was used in the upholstery, on the chandelier and other small pieces.
2. Bring in items to the room that MEAN something.
If picking your colors first is too much, think about what's going in your room.
If it's a bedroom, maybe you have a certain piece of furniture or a framed picture that is a MUST to go in the room.
I love pulling together a room around items that you love.
Shop your house first before running out to purchase all kinds of new things, you'd be surprised how much inspiration you can find!!
When putting together baby M's nursery, I 'shopped' the house first to see what I thought would work well in there.
We ended up incorporating my grandmother's antique frame, barn wood from my dad's barn & a tree slice from my childhood home.
Although small items, knowing they were things I wanted in the room helped steer me in the right direction.
It brought in wood & natural elements that I may not have leaned towards otherwise.
If you have a favorite rug or find the perfect bedding, it can definitely help point you in the right color direction. Sometimes just a swatch of fabric can inspire me to use colors I wouldn't have originally thought of. So if colors scare you, find a beautiful pattern in a piece of fabric, a rug or a bedspread that can help inspire what colors will go into the space.
3. Create a Focal Area in the Room.
This is a biggie.
I love having one area of the room that is the main, focal point.
The part of the room that your eyes land on first and then start wandering over to everything else.
In M's nursery, it was the wall her crib was on. I painted it white (the other walls were mint blue) and created a bold herringbone pattern behind the crib to be the attention-grabber.
In Em's room, it was the coral wall with the gold polka dots. Paired with the vibrant blue headboard, it's the first thing your eyes land on when walking into her room.
They can also be more subtle than a huge change in color or wall treatment.
In my dining room makeover at the old house, I created a focal wall on the beige walls we already had, using collected plates as the focal point.
I'm working on two other rooms in our house at the moment- my son's room & our master bedroom.
Both rooms are working with more neutral walls and then bringing in my colors through pieces in the room.
I've chosen my colors (in my head) and now I'm working on the focal areas of the rooms- because those will be the attention grabbers.
I tend to go towards the wall that the beds are on in bedrooms. Beds are already the main piece in the room & tend to be what our eyes land on first anyways. So I love creating a backdrop for it that is bold & interesting.
4. Sketch it out!
I'l be the first to admit that when it comes to projects in the house, I'm the kind of person that will just dive right in without having planned to do anything that day.
I may wake up and randomly decide it's time to tackle this HUGE project and then dive headfirst.
BUT I usually always have a plan. Even if the timing is spontaneous :)
Have an idea of the main parts of the room before diving into the makeover.
Know your room colors, the pieces of furniture that you're going to be putting in & for bedrooms, I'd already have your bedding picked out & ready to go.
Then sketch it out.
Or list it.
I'm a huge list person.
I may draw random blobs on a paper, label them with colors & names to give a vague idea of the room lay out.
But then I list out everything I want to get done.
It tends to look like this:
Painting walls (what colors?)
Furniture that needs to be redone (paint dresser, reupholster chair)
Sewing projects (pillows I want done)
DIY projects (a wreath, cute name banner, painted frames, etc)
And anything that needs to be bought (lamps, wooden monogram, etc)
Having it listed out helps ease my ever constant-going mind and helps me stay on track with the things that need to get done.
5. Incorporate Art that is Special to You
And you know, this tip might not be as important to you.
But for me, I want every room in our house to reflect US.
Whether it be us as a family or reflecting the person that inhabits that room most of the time.
I always find a way to bring art into the room that means something special to us.
In the nursery, we blew up large prints of the lyrics to one of our favorite songs that we knew we'd be singing to the baby all the time.
We also added sweet nicknames we had for her into barn-wood signs on either side of the crib.
In Em's room, we added several framed prints of her friends & family- she loves people and is happiest when she's around them. So that meant a lot to her.
I added two framed quote prints that matched her personality and are good reminders for her as she fights through the drama of being a girl :)
And although it's not wall art, we made sure to incorporate an art station in a nook of her room to encourage her love of creating.
It's her.
So her room needed to be a reflection of her artsy, people-loving personality.
If you've been a follower for long, you know that I'm a little obsessed with words & creating projects around them.
I'm constantly adding art to the house that is centered around our favorite verses, quotes & lyrics.
A few examples:
The latest mantle set-up includes the lyrics to our current favorite song as the centerpiece.
And I just finished creating a piece of art for the master bedroom using one of my favorite love quotes here.
And the kitchen is sporting one of my handmade signs with a beautiful verse here.
And if making signs isn't your thing, creating printables to print & frame is the easiest way to add some personalization to your room.
Blow them up for a huge focal point or frame them for easy & beautiful accents.
If you didn't know how obsessed I am with prints, you can check out all the ones I've made & shared over the years here.
Make your rooms all about you!!
What makes you happy, what is special to your family!!
I love the things in my house to be unique & descriptive of US.
6. Remember that Creating a Beautiful Room Takes Time!
It doesn't happen overnight.
Even with super motivated, overly-ambitious, wheels turning constantly, people like me don't get it done in a day!!
Em's room came together gradually.
Finishing projects, painting pieces.
Collecting the items I wanted.
Most of the furniture we had already but we did have to wait for the perfect piece to fill in certain areas- and for budgets to allow for them!!
That's why your list & plan comes in as so important!
Knowing what you're looking for & what you need to save for will keep you on track for finishing with a room that you love!!!
Our master bedroom is becoming a very slow, waiting game of a room.
I have in my head what I want it to look like.
But finding the headboard I wanted took several months.
Now we're waiting & saving for a couple other pieces we've had our eye on.
Not to mention all the unfinished projects on my list.
So don't rush it!!
Rushing tends to create stress, make the whole process a lot less fun & you end up settling with something you don't like.
And I'm learning to practice what I preach because waiting is hard!!
I'm Type A in the fact that I HATE having things unfinished.
Having furniture waiting to be painted in my room has been BUGGING me. Not having the room painted is aggravating. I still have cardboard boxes of books stacked in the corner of my room. And that makes my Type A brain go crazy.
But I keep looking at my plan, going over the list & knowing that once the pieces fall into place, it's going to be a beautiful space that I LOVE.
And then I wander into Baby M's room or Em's room and sit in a room that is finished & gorgeous.
It resets my mind a little :)
----------------------------------------------------------------------------------
Anyways.
That's the best that I have for you at the moment.
I hope it made sense & helps steer you towards taking the plunge into making over one of your rooms!!
I'm a huge believer in creating a home that makes you smile every time you walk into it!!
That's exactly how it should be.
Don't be scared to dive into it- the great thing about it is that {most of} it isn't permanent.
Wall color may be a bit harder to change :)
But dive in, and if you don't like it, it can be changed.
I usually edit things several times before deciding that the room is 'done'.
Most importantly- have fun & ENJOY the process.
I love working on rooms in the house & hearing what the kids want to incorporate or throwing ideas around with the hubby.
I love that it's OURS.
And that's just the way it should be :)
Happy monday friends!!
Hope it leaves you blessed & inspired!!


